Tuesday, July 26, 2016

Mexican Gorditas (Griddle Cookies)


Most of us have those cherished childhood memories of our moms making us a special treat. One of my favorite memories as a kid was my mom making these Gorditas (Mexican Griddle Cookies). Seeing her make these cookies usually meant we were in for a treat of Gorditas with Mexican hot chocolate... yummy! I can still picture myself as a young girl patiently waiting until they were done... 
 
  I have to admit, I still consider myself that same lucky girl. My mom is in her late sixties and still makes special treats for her family. I was having a lucky day this past weekend, when both my dad and I asked her to make Gorditas within the same week. I guess great minds think alike! 
 
This time I made of point of having my mom measure the ingredients as she prepared the dough so I could document it for the blog. One thing about my mom, she doesn't use a single measuring cup or spoon. Trying to get any recipe from her through the years has been a bit challenging. Well this time, you guys are in for treat!  These cookies are tasty and delicious. They have a buttery flavor with a hint of cinnamon.  They are excellent with a cup of coffee or cup of hot chocolate.  They are great for breakfast (which I had this morning) or an afternoon snack.
 
This is one of my most cherished family recipes and I hope you give it a try.
 
 
Happy Cooking Everyone

Mexican Gorditas (Griddle Cookies)
Makes 18-20

Ingredients:
4 cups all purpose flour
2 cups salted butter, softened
1/2 teaspoon salt
1/2 tablespoon ground cinnamon
1 1/2 cups granulated sugar
1 tablespoon vanilla extract
1 1/2 tablespoons baking soda
1/4 cup evaporated milk
3 large eggs, room temp

1. Place all ingredients together in a large bowl


2. Knead with your hands until combined


3. The dough will have a shiny look.  Allow the dough to rest 30-60 minutes. This is an important step to allow the flavors to combine.


5. Once dough has rested, divide into18-20 balls (about 2 inches wide)


6. Between two pieces of wax paper, roll the balls into 5 inch circles. Use a Mexican tortilla press if you have one. They work amazing.

7. Cook cookies on a heated griddle about 3-4 minutes on each side. The cookies should appear toasted.
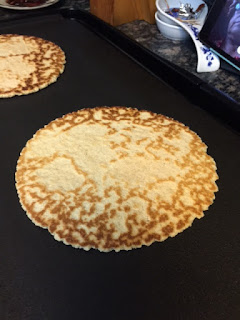


8. Cool on at kitchen towel for about 5 minutes and enjoy! The cookies will get a bit harder the next day, but it makes them even better for coffee.


Enjoy.


Tuesday, July 19, 2016

Pepper Jack and Green Chile Cornbread Madeleines for #thecreativecookieexchange

Have you ever had a savory madeleine? If not, you're in for a treat with my Pepper Jack Cheese and Green Chile Cornbread Madeleines!
The theme for this month's Creative Cookie Exchange was cheese. As most of you know, I can't eat dairy (wah!) except for small amounts of butter or milk/cream in some baked goods, so to be honest, I was unable to eat my own creation. Everyone who tried them, enjoyed them so I am trusting their judgement on this one. I don't think they would steer me wrong!
These madeleines are not the kind you would have for dessert with a cup of tea (although you could if you wanted!). Think of them as the perfect side dish to a bowl of your favorite chili or tomato soup. 
So, c'mon.  Be wild and take a walk on the savory side! You just might find you enjoy it there...


Green Chile and Pepper Jack Cheese Cornbread Madeleines
Makes 24

Ingredients:
1/4 c diced yellow onion
1 cup yellow cornmeal
1 cup all purpose flour
1/2 teaspoon salt
1 tsp baking powder
1 large egg
1 1/4 cup buttermilk
4 tablespoons honey
5 tablespoons butter melted and cooled
1/2 cup diced green chiles
1/2 cup grated pepper jack cheese

Directions:

Preheat oven to 350 f

Spray a madeleine pan with nonstick spray and set aside.

Heat 2 tsp of olive oil in a small skillet and cook the onions over low heat until softened. Drain and set aside to cool.

Whisk together the dry ingredients in a large bowl.

In a separate bowl, whisk together the egg, milk, honey and melted-cooled butter.

Add the wet ingredients to the dry ingredients and mix until just combined. Fold in the cheese and green chiles.

Spoon enough batter to just fill each madeleine cavity. Bake approx. 10 minutes or until the madeleines spring back when pressed and they are lightly browned.

Remove from oven and cool in pan for about one minute, then remove from pan. Repeat process until all batter is used (be sure to cool the madeleine pan before baking the next batch).


Serve warm or room temp with butter.

As with all Madeleines, these are best enjoyed the day they are baked.


Cheese makes everything better--even cookies! Sweet or savory, you can find them here! You can also use us as a great resource for cookie recipes. Be sure to check out our Pinterest Board and our monthly posts (you can find all of them here at The Spiced Life). You will be able to find them the first Tuesday after the 15th of each month! Also, if you are looking for inspiration to get in the kitchen and start baking, check out what all of the hosting bloggers have made:

Wednesday, July 13, 2016

Summer Fruit & Riesling Pie

Now you can have your wine and eat it too with this Summer Fruit Pie with Riesling in the filling!
 
I liked that the pie was not overly sweet and the fruit still maintained most of its' shape without breaking down into a pile of mush. You could definitely see the different combinations of fruit that was used in the filling.
 
The Riesling added a nice fruity note. Be sure to use a Riesling that you would enjoy drinking. I used a J. Lohr Riesling from Paso Robles.
 
The great thing about pie is how adaptable it is! Use different combination of fruit or the thickening agent of your choice. I used flour because that's what I had on hand, but some people prefer cornstarch or tapioca starch. Also, if you're a pie baker, you may already have your own preferred baking technique. Some prefer to bake at a high temp for the first 15-20 minutes of baking, then reducing the temperature.

If you're looking for a slightly sophisticated dessert that capitalizes on the freshness of Summer fruit and isn't too complicated to make, this recipe is for you. Use a good quality store bought pie crust for a quick short cut to make the recipe even easier!

No matter how you bake it, pie is always delicious!


Summer Fruit & Riesling Pie

Ingredients:

Double crust pie crust (store bought or homemade)
Here is my favorite pie crust recipe
Yvonne really likes this store bought crust


6 1/2 cups assorted fresh fruit (I used sliced strawberries, blueberries, sliced peaches and sliced nectarines)
*I cut the strawberries in half and left the skin on the peaches and nectarines and sliced them into 1/4" thick slices)
1/2 cup sweet Riesling wine
1/2 cup brown sugar
1/4 cup white sugar
1/2 cup all purpose flour
zest of one lemon
juice of one lemon
1/2 cup water
Egg wash: one egg beaten with a little water
Demerara Sugar (sugar in the raw) for sprinkling

Directions:

Place all of the filling ingredients in a medium size heavy bottom saucepan and toss to combine. Cook over low heat until the mixture comes to a simmer stirring often. Simmer and stir until some of the fruit breaks down and the mixture thickens (approx. 5-7 minutes). If you find your mixture is getting too thick, add a little more water.

Remove from heat and allow mixture to cool. To help with the cooling process, stir occasionally to allow steam to escape.

When filling is cool, place a rimmed baking sheet in the oven and preheat oven to 375f

Roll out your crust to approx. 1/8" thick. It should be large enough to fit in the bottom of the pie dish with 1" overhang of crust. Place the bottom crust into the bottom of a glass pie dish (I prefer glass so you can see how done the bottom of the crust it, but metal is fine also).

Scoop the filling into the pie crust lined pie dish. Make sure it is in an even layer.

Roll out the second pie crust to 1/8" thickness. Place the second pie crust on top (you can do a lattice design, cut outs like I did or leave the top crust whole). If you leave the top crust whole, trim the edges then fold under and crimp. Cut a few vent holes in the top with a sharp knife to allow air to escape. If you do a lattice effect you still need to fold the edges of the crust under and crimp. For cut outs, just cut the crust into any shape you want using cookie cutters, then lay on top of the filling making sure you overlap the pieces.


Brush the top crust and edges with the egg wash and sprinkle with demerara sugar.


Place the pie on the preheated cookie sheet and bake for 30 minutes. After 30 minutes, loosely tent the top with foil making sure there is space for air to circulate underneath the foil and continue baking for another 15-20 minutes or until the fruit has a slow bubble and the crust is golden brown. If you used a glass pie dish, you can lift the pie high enough to see underneath to check to make sure the bottom of the crust is done too.

Remove from oven and place the pie on a wire cooling rack for several hours to cool before serving.
Serve with whipped cream, ice cream and another glass of wine!


Pie is best eaten same day or next day.


Recipe adapted from Bakeaholic Mama

Thursday, July 7, 2016

Raspberry & Meyer Lemon Madeleines for #theleftoversclub

What are Meyer Lemons still doing in the grocery stores? I'm not sure, but when I saw them in the produce section while I was grocery shopping the other day, I snatched some right up!
 
As you probably already know by this post and this one and this one, Meyer Lemons are one of my all-time favorite citrus fruits to bake with. I actually prefer them over regular lemons.


Finding these Meyer Lemons in the store was perfect timing for me because the theme of this month's Leftover Club exchange is citrus! The zest and juice of any citrus fruit adds so much flavor to your food whether you are cooking or baking.
 
I decided to use the Meyer Lemons in one of my all-time favorite cookies, French madeleines. French pastries hold a very special place in my heart. What's not to love about a good French pastry? I could eat flaky croissants, kouign amann and macarons every day! 


I hope my partner Kathia from Basic n Delicious enjoys them!


If you'd like to exchange yummy baked goods with fellow food bloggers from around the country and receive a special package in the mail each month, sign up over at Alwayz Bakin'! We'd love to have you in the group!


Raspberry & Meyer Lemon Madeleines
Makes 2 1/2 dozen madeleines

Ingredients:
1 1/2 cups all purpose flour
2 teaspoons baking powder
2/3 cup granulated sugar
zest from one meyer lemon
3 large eggs, room temp
1/4 cup milk
juice of one meyer lemon
13 tablespoons unsalted butter, melted and cooled to room temp
fresh raspberries
powdered sugar for dusting (optional)

Directions:

Butter and flour a madeleine pan. Set aside.

Combine flour and baking powder in a small bowl. Set aside.

In another small bowl whisk together the lemon juice, milk and cooled butter. Set aside.

Place the sugar in a small bowl with the lemon zest and crush the zest with the sugar using your finger tips. This process will release the oils from the lemon zest into the sugar and create a lemon scented sugar. Set aside.

In the bowl of your stand mixer fitted with the paddle attachment (or in a large bowl using your electric hand mixer), beat the eggs and lemon scented sugar together at medium speed until pale (approx.   min).

Add 1/3 of the flour mixture and mix at low speed just until combined. Add half of the butter/milk mixture and mix just until combined. Repeat this process ending with the flour mixture making sure to scrape down the bottom and sides of the mixing bowl as needed.

Scoop about 1 heaping tablespoon of dough into each cup of the madeleine pan and press a raspberry into the center of each mound of dough.

Bake at 375f for approx. 10 minutes or until lightly golden brown at the edges.

Cool in the pan for 1 minute then gently remove to a wire cooling rack. Dust with powdered sugar if desired.

Madeleines are best eaten the day they are baked.