Monday, October 29, 2012

Three Cheese and Prosciutto Calzone

 
My son, Nick, is in town this week visiting from Culinary School. He's been telling me all about the amazing food he's been eating and making me kinda jealous...but he did say my Hot Wings, Cheesecake and Tarts beat anything he's had there so far. Nick is a big fan of Italian food, prosciutto in particular, so I wanted to make something special for him while he's here using Prosciutto. I came up with these Three Cheese and Prosciutto Calzone. The filling is made with a mixture of Mozarella, Provolone and Goat Cheese which make a great combination with the Prosciutto, fresh Thyme and dried Oregano. I took a short cut and used store bought Pizza Dough from Trader Joe's which made this recipe super easy to make.


Three Cheese and Prosciutto Calzone
Makes 4 large Calzone
 
Ingredients:
 
2 packages of Trader Joe's Pizza Dough (found in the refrigerated section)
2 1/2 cups shredded Mozarella and Provolone Cheese Blend
2 1/2 ounces Goat Cheese
3 ounces Prosciutto, coarsely chopped
3-4 sprigs of fresh Thyme, leaves removed
1/2 tsp dried oregano, slightly crushed to release fragrance
 
 
Directions:
 
Remove the pizza dough from the refrigerator and allow to rest for approx 15-20 minutes. This relaxes the gluten and makes the dough easier to stretch.
 
Preheat oven to 425
 
Spray 2 large baking sheets lightly with nonstick cooking spray, then sprinkle with a little cornmeal. Set aside.
 
Place all of the filling ingredients in a large bowl and toss to combine. Set aside.


Cut each ball of dough in half to make a total of 4 pieces of dough. Place 2 pieces of dough on each baking sheet.
 
Using your fingers evenly stretch each piece of dough into a large square/rectangle. Try to make sure the thickness of the dough is even and that the edges aren't too thick.
 
Evenly divide the filling between the 4 pieces of dough.


Fold the dough over the filling and crimp with a fork to seal the edges. Trim any excess dough if needed.


Bake approximately 18 minutes or until golden brown. Remove from oven and lightly brush with olive oil.


Allow to cool slightly, then serve warm.


Store any leftovers in the refrigerator. Reheat leftovers in the oven.


Tuesday, October 23, 2012

Grilled Zucchini and Roasted Eggplant on Olive and Herb Focaccia with Lemon Artichoke Sun Dried Tomato Pesto


This past weekend was another busy one for me. We celebrated my Mom's birthday on Saturday with a pre-Thanksgiving Dinner and on Sunday, Yvonne and I attended a friend's Bridal Shower. This has definitely been the year for weddings! I was asked to make the side dishes for my Mom's birthday dinner and was very honored to be asked to make Sandwiches, Salads and Cupcakes for the Bridal Shower. Our friend is no ordinary bride so I knew I didn't want run-of'the-mill sandwiches. On the menu? Sonoma Chicken Salad Sandwiches with Pecans and Cranberries and Poppy Seed Dressing on Croissants, Turkey, Basil Pesto and Provolone Cheese on Sea Salt Focaccia bread, Grilled Zucchini and Roasted Eggplant with Lemon Artichoke Pesto on Olive Oil and Herb Focaccia, two types of salads, Strawberry Shortcake Cupcakes and the guest of honor's favorite, Red Velvet Cupcakes.
 
The morning of the event I was still undecided about what ingredients to use for the vegetarian sandwich option. I knew I wanted to use Zucchini and Eggplant on really good bread but I wasn't sure what else I wanted in it. A trip to Sprouts on the way to Yvonne's house that morning gave me the inspiration needed. I found the Olive Oil and Herb Focaccia Bread (baked fresh), the Lemon Artichoke Pesto, Roasted Red Bell Peppers and Sundried Tomatoes along with a few other sauces I was considering using. This sandwich turned out to be a great collaboration with Yvonne's creative suggestions and handling the grilling of the zucchini and roasting of the eggplant.
 
The combination of ingredients and the freshly baked bread was a hit with the guests, even those that were not vegetarian!

Here's how we made it:


Grilled Zucchini and Roasted Eggplant on Olive Oil and Herb Focaccia with Lemon Artichoke Sun Dried Tomato Pesto

Make 2 large sandwiches
Feeds 8-10


Ingredients:

2 loaves of Olive Oil and Herb Focaccia Bread approx 8" wide(I bought mine at Sprouts) or any other Focaccia Bread of your choice

1 small container of Lemon Artichoke Pesto (I bought mine at Sprouts in the Condiment aisle)

2 tablespoons of Sun Dried Tomatoes (packed in oil), drained

2 medium sized zucchini, sliced 1/3" thick

2 medium sized eggplant, sliced 1/3" thick (try to use Japanese Eggplant if you can find it)

3 roasted red bell pepper from a jar, split, seeds removed adn sliced into 1.5" wedges

Salt and fresh ground pepper for seasoning
Baby Spinach or Field Greens
Drizzle of Olive Oil for finishing
Drizzle of Balsamic Vinegar for finishing (optional)

Directions:

Slice both loaves of bread in half, horizontally.

Heat grill pan over medium high heat and preheat oven to 400 degrees.

Spray a baking sheet with non-stick spray.

Toss the Eggplant and Zucchini slices with some olive oil, salt and pepper

Grill the Zucchini in the grill pan 3-4 minutes on each side or until desired doneness. You want them to be tender but still with a slight bite, not mushy.

Roast the Eggplant in the oven approximately 10 minutes each side. Again, you want them to be tender with a slight bite, not mushy.

Let the Eggplant and Zucchini cool to room temperature.

In the bowl of a food processer, process the Lemon Artichoke Pesto with the drained Sun Dried Tomatoes until the Sun Dried Tomatoes are chopped and incorporated but the mixture is still chunky.

Spread half of the pesto mixture on the bottom of both loaves of bread.

Lay the roasted red bell pepper slices in a circle on top of the pesto mixture.

Layer the cooled Eggplant and Zucchini on top of the roasted red bell peppers.

Top with baby spinach or mixed greens.

Drizzle with a little olive oil and balsamic vinegar if desired.

Insert Sandwich Picks and slice into wedges.

Enjoy!!

Note:

You can choose to roast OR grill your eggplant and zucchini (instead of doing both). We decided to do both due to time.

Customize this recipe using the ingredients of your choice!


Thursday, October 18, 2012

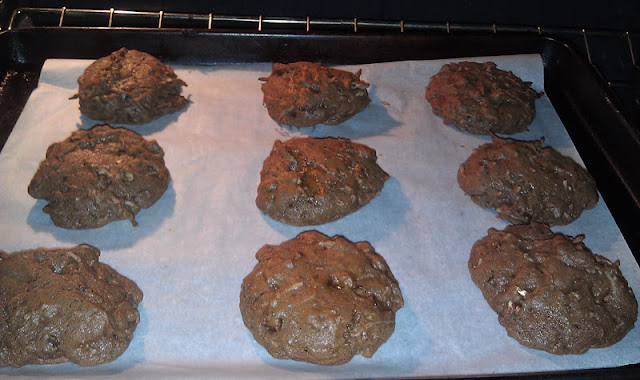
German Chocolate Cake Cookies

German Chocolate Cake Cookies (adaption of Sunny Anderson)

Hmmmm.Hmmmm… that is how I am starting this recipe!!  I found this recipe a few weeks ago when I was looking for a new German Chocolate Cake recipe to try for my boyfriend’s birthday.  I’ve always liked watching Sunny Anderson but I had never made any of her recipes.  I thought I would give this recipe a try and made it for a baby shower last weekend (we had Ice Cake for Earl birthday this time instead, recipe to follow in the future).  I made only one alteration from the original recipe due to my ingredients in my pantry, hence the chocolate has mini chocolate chip.  I think they worked wonderfully, actually made the cookie even moist!  Let me tell you, I made four desserts for the baby shower and these GERMAN CHOCOLATE CAKE COOKIES were the first to go. And there were LOTS of other desserts on that table too!  If you love German Chocolate Cake like my boyfriend and I (both of our favorite cake, go figure!) ,this cookie will totally hit the spot and is so much easier to make!.  The cookie has a wonderful taste.   It’s definitely the brown sugar that gives the dough a rich caramel favor. Then once you add the chocolate chips, coconut and pecans it is pure goodness!  I’m not one to actually try a raw dough, just never been one to like it, but I have to admit I ate a nice spoonful!!

Happy Cooking everyone.


Ingredients
--------------------
1 cup of butter
1 cup light brown sugar
1 cup white sugar
2 teaspoon vanilla
2 large eggs  (beaten)
2 1/4 cups all purpose flour
½ cup unsweetened cocoa
1 teaspoon baking soda
Pinch of salt
½ cup semi sweet chocolate chips
½ cup mini semi sweet chocolate chips
1 cup shredded sweetened coconut (packed)
1 cup rough chopped pecans


Directions
1. Preheat oven to 375 degrees
2. Line cookie sheets with parchment paper and set aside.
3. Dry ingredients - Add flour, cocoa, baking soda and salt in a medium size bowl. Mix using a whisk and set aside.

4. In another bowl, combine chocolate chips, sweetened coconut and pecans. Mix and set side.

5. Using a large bowl, add butter, brown sugar and white sugar and mix with an electric mixer (a tip I learned from Faye for Chocolate chip type cookies, its best to use an electric mixer to a Kitchen Aid, makes a huge difference).

6. Add beaten eggs with vanilla beat with mixer till all combined (do not over beat)
8. Gradually add the flour mixture you had prepared first to the sugar/egg mixture (do not over beat)

9. Once cookie dough is done, stir (with spoon) in the chocolate chip/coconut/pecan mixture till it is combined.

10. Using an  ice cream scoop,  make 1 inch to 1 ½ inch drops of dough on cookie sheet.  (I was able to get 9 per sheet)
11. Bake for 9-10 minutes.  Cool baking rack.


ENJOY!!!

Tuesday, October 16, 2012

Broiled Salmon Skewers with Baked Brown Rice


Now that my husband and I are empty nesters, I'm having to adjust my cooking style for two people instead of a family of five especially since I'm not a fan of leftovers. Cooking in smaller quantities definitely takes some getting used to. In addition, we're also trying to adopt a healthier lifestyle. The other night I made Broiled Salmon Skewers and Baked Brown Rice. Easy, delicious, and really healthy. I paired them with some steamed broccoli for a perfect, healthy weeknight meal.


Broiled Salmon Skewers and Baked Brown Rice
Makes 4 skewers

Broiled Salmon Skewers
1 lb fresh salmon (try to get a thicker cut), cut into 1.5" cubes
2 tablespoons fresh parsley
3 garlic cloves, minced
2 tablespoons ketchup
2 tablespoons brown sugar
1 teaspoon cayenne pepper
1 teaspoon salt
Assorted Veggies - I used yellow and red bell pepper cut into large pieces and small cherry tomatoes which I kept whole.

If using wooden skewers, soak them in water for 30 minutes before assembling your skewers. This will prevent them from burning under the broiler.

Make the marinade: Place all ingredients in a small bowl and stir to combine. 


Assemble the skewers then place them in a large resealable ziploc bag. Add the marinade and rub to spread the marinade over the skewers.


Refrigerate for at least 30 minutes.

Set your oven to broil.

Place your oven rack 6" away from the heating element.

Place the skewers on a broiler pan or baking sheet lined with non-stick foil (or spray regular foil with nonstick spray).


Broil for 3-4 minutes then turn over and broil 3-4 minutes more or until desired doneness is reached.

Remove from oven and serve with brown rice and broccoli or any other side of your choice.


Baked Brown Rice

I found this recipe for Baked Brown Rice from Alton Brown. I liked that it was simple and cooked in the oven instead of the stove top or in a rice cooker (since I don't have one!). It turned out moist, fluffy and delicious. This is now my go-to recipe for brown rice. I encourage you to give it a try.


Thursday, October 11, 2012

Lemon Rosemary Pine Nut Cookies for Nicole

Shakespeare said this so well. ”Parting is such sweet sorrow”. As we all go though our careers we will meet people that come in and out of our lives.  I wanted a good gift for a friend who was leaving the company I work for and going out on her new adventure, so I took Shakespeare’s words to heart and made something sweet!  I don’t know any other way to say good bye, but by baking something sweet.  So I was inspired this week to make these cookies that I have wanted to make for a few months now.  These LEMON ROSEMARY PINE NUT COOKIES turned out delicious and are perfect for any going away gift or just as a special treat for you.  The cookie components are perfect! Just the right amount of lemon flavor, the rosemary is not too strong and adds just enough flavor to keep people wondering, “what is that?” and finally the pine nuts… I love pine nuts! They’re probably my favorite nut. The pine nuts give this cookie a wonderful twist by adding just enough texture to what would be an otherwise basic cookie.
I hope you give this wonderful recipe a try!
Nicole, wish you nothing but luck in your new adventure. 


Lemon Rosemary Pine Nut Cookies for Nicole
Ingredients
1 ½ cups flour
¼ teaspoon baking powder
1/8 teaspoon salt
½ cup chopped pinenuts
½ cup soften butter
½ cup sugar
1 tablespoon lemon zest
½ teaspoon minced fresh rosemary
1 large egg
4 tablespoon Turbinado sugar
1 teaspoon finely grated lemon peel
1.     In a Medium size bowl combine flour, baking powder,salt and pinenut and set aside


2.     Using an electric mixer or Kitchaid, Mix butter with sugar till smooth
3.     Add lemon zest and rosemary and egg. Mix till well combined

4.     Gradually stir in flour mixture to butter mixture till everything is incorporated together.
5.     Divide dough in half. Mold into a roll about 7-8 inches long by 1 to 1 ½ inch wide. Place on saran wrap and refrigerate for 2 hours.
6.     Preheat oven to 375.
7.     Mix he 4 tablespoons of Trubinado sugar and the lemon peel.  Pour and scatter on large plate.
8.     Remove saran wrap from one roll. Roll the roll on the sugar mixture till the roll is coated.  Repeat process to the second roll.  Cut Rolls into  ¼ inch circles.


9.     Please on a ungreased cookie tray and bake for 7-8 minutes. Edges will be a light brown color.
10.                        Cool and Enjoy!!


Monday, October 8, 2012

Pumpkin Cupcakes with Pumpkin Cream Cheese Frosting and Biscoff Caramel Drizzle


I'm so excited that Fall is here and the Summer heat waves are behind us (hopefully)! To me, Fall means being able to layer up in sweaters and boots, enjoying shorter days and longer nights spent snuggled up on the couch, maybe even by a fire, preparing for my favorite holiday (Thanksgiving which happens to be my birthday!) and of course it means indulging in the flavors of the season...apples, pears, pumpkin, cinnamon, cloves and nutmeg! These cupcakes are a tribute to some of my favorite Fall flavors.

The pumpkin cupcakes are light and fluffy which pairs well with the pumpkin cream cheese frosting. Both have a hint of classic fall spices; cinnamon, nutmeg and cloves. The Biscoff Caramel Sauce adds a very special touch, but of course you could use any caramel sauce of your choice (even store bought!) but if you've never tried Biscoff, I encourage you to give it a try. Biscoff spread is made from Biscoff cookies which are a cinnamon cookie popular in England. 


Pumpkin Cupcakes with Pumpkin Cream Cheese Frosting and Biscoff Caramel Drizzle
Adapted from The Baker Chick
Makes 24 cupcakes

Cupcake Ingredients
2 cups all purpose flour
2 1/4 teaspoons baking powder
1 teaspoon salt
3/4 teaspoon baking soda
1 teaspoon cinnamon
1/2 teaspoon nutmeg
1/8 teaspoon cloves
1 1/4 cups light brown sugar
4 large eggs, room temperature
3/4 cup canola or vegetable oil
1/2 cup milk, room temperature
1 15oz can pumpkin puree (not pumpkin pie filling)

Frosting Ingredients
1/4 cup canned pumpkin puree
1 8oz package cream cheese, softened
4 tablespoons unsalted butter, softened
4 cups powdered sugar
1 teaspoon vanilla extract
1/2 teaspoon cinnamon
1/8 teaspoon nutmeg
pinch of cloves

Biscoff Caramel for drizzling (optional)


Directions:


Make the cupcakes

Preheat oven to 350

Line two 12 cup cupcake pans with paper liners.

In a large bowl, whisk together the flour, baking powder, salt, baking soda and spices. Set aside.

In the bowl of a stand mixer fitted with the paddle attachment (or using your hand mixer), cream together the brown sugar and eggs until creamy (approx 3 minutes). Add the oil and mix well, then add the pumpkin puree. Mix well to combine.

Add 1/3 of the flour mixture and mix well, then add half of the milk. Repeat the process ending with the last 1/3 of the flour mixture, mixing well after each addition. 


Divide the batter evenly between the 24 cupcake liners. 

Bake for 18-20 minutes or until a toothpick inserted in center comes out clean. For even baking, rotate the pans front to back halfway through the baking process.


Remove from oven. Cool in the pans for a few minutes then remove to a cooling rack to cool completely.


Make the frosting

In the bowl of a stand mixer (or using your hand mixer), cream the cream cheese and butter together until smooth and fluffy with no lumps. 

Gradually add the powdered sugar at low speed, then increase speed to medium and beat until combined. Add the vanilla extract and spices and beat at medium speed.

Check consistency. If you want a stiffer frosting, add more cream cheese. 


Allow the frosting to set in the refrigerator for about an hour.


Decorate

Pipe or spread frosting onto cooled cupcakes and decorate as desired.

Drizzle with Biscoff Caramel Sauce (or any other caramel sauce of your choice). I made Biscoff Caramel sauce from this  recipe on Le Cafe Sucre Farin. It's made in the microwave and is super easy to make! If you've never had Biscoff Spread before, I encourage you to try it. You can find it at World Market.

Since the frosting contains cream cheese, store leftovers refrigerated. Allow to come to room temperature for about 30 minutes before serving.


A note about cupcake liners: We all love to use the cute, printed or solid color cupcake liners, but sadly, if you do not use greaseproof cupcake liners the print/color will most likely disappear after baking (especially if the recipe uses oil). To retain the print/color of your cupcake liners, make sure you buy greaseproof cupcake liners. You can find them online (I like Bake It Pretty) and in some specialty stores. The liners I used in these photos were not greaseproof so you can see that the cute pumpkin print faded so I placed the finished cupcakes in another liner for the photos. With or without the cute liners, these cupcakes are delicious!

Friday, October 5, 2012

October Pink Ribbon Apple Bread

October Pink Ribbon Apple Bread
                                              (this years apples from the tree)

 
October is Breast Cancer Awareness Month. This cause is very close to my heart since my Mom is a two time breast cancer survivor. Ten years cancer free this year. She is the strongest woman I know and I am proud to be her daughter.

Our company was doing a Breast Cancer Awareness day and asked everyone to wear pink in honor of the cause. I always do what I can to support this special cause, and I do it the best way I know.. I baked!! J
Everyone who chose to wear pink, was treated to delicious Apple Bread made with the apples from our tree. This year the tree produced a full bucket of apples!  I made 2 apple pies, 6 mini apple breads, 1 regular size apple bread and one jar of apple sauce.  Not bad, not bad at all….  Now back to the Apple bread, it was a hit. The bread is moist with a nice taste of cinnamon.  Since the apples are shredded, you can taste the freshness throughout the bread.  Delicious and perfect for the Fall and Winter months with a nice cup of coffee.. I hope you give this recipe a try, whether it’s for yourself or a special cause of your own.


                                                     Happy Cooking!!

Ingredients
1 ½ cup all purpose flour
1 teaspoon cinnamon
½ teaspoon baking soda
½ teaspoon salt
½ teaspoon baking powder
¼ teaspoon nutmeg
1 egg
¾ cup sugar
¼ cup vegetable oil
½ cup whipping cream
1 cup peeled then shredded apples
2 tablespoons sugar to sprinkle


Preheat oven to 350
1. Spray an 8x4x2 loaf pan (or two mini loaf pans) with non-stick spray
2. Mix together all the dry ingredients. Set aside.


3. Beat egg and add to sugar, vegetable oil and cream. 
4. Stir in shredded apple.


5. Add the dry ingredient mixture to the apple mixture. Do not over mix.


6. Pour into loaf pan and sprinkle with sugar.
7. Bake for 45-50 minutes or until golden brown on top and
the middle is set


7, Cool, then slice and eat