Friday, November 30, 2012

Baked Fish Taco’s with Mango Salsa and Chipotle sauce

Baked Fish Taco’s with Mango Salsa and Chipotle sauce

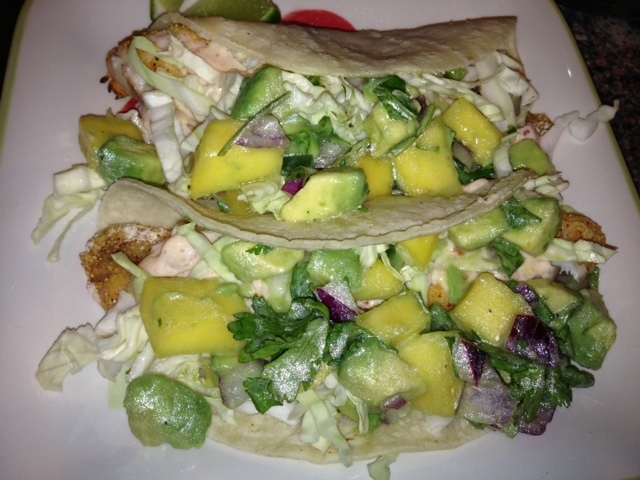
It’s so hard to be healthy when you live close to your mother who is an amazing cook!  My boyfriend’s favorite recipe my mother makes is her fish tacos! But of course they are battered and deep fried and covered in a thick white sauce, and well just delicious!  So this week I was on a mission to try and come up with a lighter version which still has that amazing flavor and Earl will not feel so deprived. I have to say, that these Baked Fish Taco’s with Mango Salsa and Chipotle Sauce were amazing.  The flavor of the fish, with the sweet-tangy salsa and then the creamy sauce with a little kick made an amazing dinner. I received two thumbs up. And the best part, the whole meal end up costing under $25.00, feeds four people and took only 1 hour and 15 minutes to make.  I hope you give this recipe a try and let us know how it works out for you. Happy Cooking!!
Fish:
4 Tilapia Fillets sliced into strips (I got 3 strips per fillet)
¼ cup fresh squeeze lime juice (about 3 lime, keep limes after juicing)
1 teaspoon Garlic salt
Breading:
¼ cup Flour
1/3 cup Cornmeal
1 teaspoon chile powder
1 teaspoon seasoning salt
¼ teaspoon pepper
¼ teaspoon garlic powder
Mango Salsa:
1 ripe mango
1 ripe avocado
3 tablespoons chopped red onion
2 ½ teaspoons finely chopped jalapeno
¼ cup chopped cilantro
2 tablespoons lime juice
1 tablespoon Canola oil (you can use olive oil too)
Salt and pepper to taste
Chipotle sauce:
¼ low fat yogurt
¼ cup sour cream
¼ light mayo
2 tablespoons Milk ( I used 1%, it’s what I have in my frig)
2 chipotle pepper in adobo sauce, chopped (they come in a can, located in the Mexican section of your market)
½ teaspoon salt
¼ teaspoon pepper
Misc:
Chopped cabbage
8-12 corn tortillas
Place your large cookie sheet in the oven and preheat oven to 475 degrees.
1.      Take your sliced fish and place into plastic ziplock bag. Mix the lime juice with the garlic salt and pour over the fish. Add the three cut juiced limes for extra flavor.  Shake bag a bit too so that all the fish is coated. Set aside for 20-25 minutes   (step #6 start with the fish again)

2.      While the fish is marinating, you have perfect time to finish the breading, mango salsa and sauce.
3.      Breading: mix together the flour, cornmeal, chile powder, salt, pepper and garlic power in a medium size bowl.  Set aside.


4.      Salsa: Chop the mango and avocado into small bit sides (one of Earls comments was that I cut the mango a bit too big and it should have been smaller), put into small bowl. Add the chopped red onion, Jalapeno, Cilantro.  In another small bowl or cup, add the lime juice, oil, salt and pepper.  Mix with a fork till well blended.  Pour over the Mango salsa and mix. Do not over mix or the avocado will start breaking down.  Put in refrigerator until ready to use.


5.      Sauce: Combine yogurt, sour cream, mayo, milk, chopped chipotle pepper, salt and pepper together. Mix till all is well combined.  Put in refrigerator until ready to use.

6.      Chop cabbage and set aside.

7.      Back to fish, remove hot cookie sheet from the oven. Spray with cooking oil (be careful that it doesn’t splash back) . Set on counter.  Remove fish from marinade.  Pat each piece dry and put into breading mixture. Make sure piece is coated on each side, then place fish on the hot cookie tray. Once all the pieces have been coated, put back into oven.  Bake for 4 minutes, then take tray out and flip the piece with a spatula and bake for another 4-5 minutes. Remove from oven.

8.      Put your tortillas in the microwave for about 1 minute, they will be nice and pliable.  Or you can warm them on a griddle on your stove.
9.      Time to start assembling.   Take one tortilla, add one piece of fish, add about 1 table spoons of sauce (or more, the stuff is amazing!), add a handful of the cabbage and then 1-2 tablespoons of salsa, fold!

10.  Enjoy!!!

Wednesday, November 28, 2012

Baked Lemon Glazed Donuts


My inspiration for this recipe was the new Donut Pans I received recently for my birthday. I have been dying to get one for a while now and my thoughtful friend/co-worker, Merry, surprised me with not only one, but two Donut Pans for my birthday! I think she secretly wanted me to make donuts and bring some into work, which I did....


I guess you can say these donuts are kinda healthy.... they're baked, not fried, and are made with a combination of wheat and all-purpose flours as well as Greek Yogurt. They're surprisingly light and not overly sweet which means you can have more than one and not feel too guilty! No matter how you spell it (Doughnuts or Donuts), these Baked Lemon Glazed Donuts are delicious.

Baked Lemon Glazed Donuts
Makes 12 regular sized donuts

Ingredients:
1 cup all purpose flour
1/2 cup whole wheat flour
1/2 cup granulated sugar
1 teaspoon baking powder
1/2 teaspoon baking soda
1/4 teaspoon salt
1 egg
1 small container of Chobani Lemon Green Yogurt (6 oz)
1/3 cup vegetable oil
1/3 cup buttermilk
1/2 teaspoon vanilla bean paste or vanilla extract
Zest from one large lemon

Glaze Ingredients:
1 cup of powdered sugar
Juice from one lemon
Zest from 1/2 lemon

Directions:

Preheat oven to 325 degrees farenheight

Lightly spray 2 regular size donut pans with non-stick spray. I only had one regular size pan, so I baked one batch at a time.

In a large bowl, whisk together the flours, sugar, baking powder, baking soda and salt.


In a medium sized bowl, whisk together the egg, yogurt, oil, buttermilk, vanilla bean paste and lemon zest.


Make a well in the center of the dry ingredients and pour in the wet ingredients. Mix just until combined.


Divide batter evenly into the prepared donut pans, then spread to make smooth and uniform.


Bake approx 10-12 minutes or until donuts spring back when lightly touched. Do not overbake.

Remove pan from oven and allow to cool in pan for 1 minute then invert onto a cooling rack with parchment paper underneath. Turn donuts right side up.

While donuts are baking, make the glaze - combine the powdered sugar, lemon zest and lemon juice and mix until smooth. Add more powdered sugar for a thicker glaze if desired.

Allow the donuts to cool slightly then glaze while still warm by drizzling the glaze over the top or dunking the top of  the donuts directly into the glaze. I preferred dunking :)


Enjoy warm or room temperature. Store leftovers in an air tight container for up to one day.


Monday, November 19, 2012

My Kinda Breakfast Sandwich


Yvonne and I both moved recently and we both realized we have waaaaay too much stuff. So this past weekend, Yvonne and her boyfriend Earl had a yard sale and my husband and I brought over a few items to sell. Getting up super early on a weekend is never fun, but this breakfast sandwich made it all worthwhile. I call our collaboration "My Kinda Breakfast Sandwich" because it's "kinda" on the healthy side if you disregard the fact that it has bacon in it, and not just regular bacon, we're talking MAPLE Bacon. The slight sweetness of the bacon was not overpowering and was a perfect compliment to the rest of the ingredients.

Like many of our recipes, this recipe is a great guideline and can be customized using your own favorite ingredients.

We hope you'll try this recipe for "My Kinda Breakfast Sandwich" and that it becomes your kind as well!


My Kinda Breakfast Sandwich
Serves 6

Ingredients:
8 large or extra large eggs
3 tablespoons milk
Salt & Pepper to taste
1 orange bell pepper diced (red would be good too)
4 tablespoons unsalted butter
12 slices of bacon (we used Maple Bacon)
2 tomatoes thinly sliced
2 avocados thinly sliced
12 slices for Whole Grain Sourdough Wheat Bread (or any bread of your choice)
6 slices of cheese (we used Colby Jack)
Softened butter for the toast

Directions:

Preheat oven to 425 degrees farenheit.

Cook bacon to desired doneness and set aside.

Crack eggs into a medium sized bowl. Add milk, salt and pepper and whisk to combine. Set aside.

Melt butter in a medium sized non-stick skillet over medium heat. Add diced bell pepper and saute for 2 minutes or until softened.

When bell peppers have been softened to your desired doneness,  reduce heat to medium-low. Re-whisk the eggs and add to the skillet. Cook allowing eggs to set while running a rubber spatula around the edges and tilting the pan to allow more egg to run to the edges (similar to how you would make a Frittata). When eggs are set but still slightly runny on top, place the skillet in the oven to cook the top of the eggs. This process takes a few minutes. Keep an eye on the eggs and remove when set on top.

Remove from oven and allow eggs to set for a few minuites. Then slice into wedges for your sandwiches.

Altenatively you can just scramble the eggs with the peppers.

Assemble the Sandwiches:

Toast the bread and spread with butter.

Place cheese on four of the toasted/buttered bread slices.

Place a wedge of egg on top of the cheese. Top with 2 slices of cooked bacon.

Top with sliced tomatoes and avocado.

Top with another piece of buttered toast.

Serve warm and enjoy!

Thursday, November 15, 2012

Bring on the Holidays with this Chocolate Chocolate-chip Pumpkin Cake

                    Chocolate Chocolate-chip Pumpkin Cake 


The holidays are definitely in the air!!!  I bought my Bundt pan quite a while ago and rarely use it. Honesty, it’s just because I forgot about, it’s a great pan.  So I was looking for something to make in the pan, this is really what inspired my latest recipe. But who is to question who, where or what inspires you to start baking?  It might be we inspire you to go get a Bundt pan and make this amazing Chocolate Chocolate-Chip Pumpkin cake (wishful thinking Faye and I’s part J).   This recipe is perfect for all those holiday parties you will be invited to in the next couple of weeks.   The cake tastes and looks like you have spent a ton of time making, when in reality its super easy.  The main thing is time. You need a bit of time for the cake to cool before you add the icing. You probably want to make it the day before or early in the morning. The cake is teen approvedJ.  My boyfriend’s daughter loved it. This is the second dessert she has actually requested I make again (first being the German Chocolate Cake Cookies that were featured a few weeks ago).  The Chocolate Chocolate-Chip Pumpkin cake has a wonderful spice flavor.  The pumpkin adds texture and flavor, while the cocoa and chocolate chips just send the cake into taste bud heaven!  I hope you give this recipe a try.  Happy cooking everyone!


Batter
---------
2 ¼ cups flour
¼ cup cocoa
2 teaspoons baking powder
1 teaspoon baking soda
1 teaspoon cinnamon
¼ teaspoons cloves
¼ teaspoons nutmeg
½ teaspoons salt
1 teaspoon vanilla
1 ¼ cup solid pumpkin (NOT the Pumpkin pie Mix, usually in the same area of your grocery store)
¾ cups buttermilk
¾ cup butter (1-½ sticks)- softened
1 cup sugar
3 large eggs
¾ cup of good quality semi-sweet chocolate chips

Icing
------
3 cups of powder sugar
5 tablespoons heavy cream
2 tablespoons milk
1 teaspoon vanilla

 One 10 inch Bundt pan

***Tip: Sometimes ingredients can costly, especially items you do not use very often.   I recommend for the cinnamon, cloves and nutmeg, you can go to your local specialty market (like a Sprouts, Henrys and Frasier Farms and buy them by bulk. That way you pick up only what you need)
****Second Tip: Buttermilk is not an ingredient a lot of people have in their fridge these days.  So for a quick fix so you don’t have to purchase a whole pint of buttermilk, take 1 cup of milk and add 2 tablespoons of  Fresh lemon juice or 1 tablespoon of vinegar.  Mix together and set aside for 5 minutes.  And Presto! You have butter milk!

-----------------
Preheat oven to 350 degrees

Spray the interior of the bundt pan generously with nonstick spray. Set aside.

Using a whisk (or fork), in a medium size bowl combine flour, cocoa, baking powder, baking soda, cinnamon, cloves, nutmeg and salt. Set aside.


In a separate bowl, combine pumpkin, buttermilk, vanilla. Set aside

Using a stand mixer or electric hand mixer, in a large bowl beat butter and sugar until it is fluffy.  Add eggs one egg at a time to butter mixture until it’s fluffy.


To the egg mixture, alternate between adding the flour and the pumpkin mixture, beat at low speed until all the components are mixed together and smooth.

Stir in chocolate chips.


Spoon mixture into the bundt pan and spread evenly.


Bake for 45-50 minutes or until a tooth pick inserted in the middle comes out clean.

Cool in bundt pan on cooling rack for 15 minutes. Flip cake over on large serving plate and allow to cool completely.


While cake is cooling , make icing: Beat together powder sugar, heavy cream, milk and vanilla.

Once cake is cooled pour icing over cake.  Icing should set in 1 hour.


Enjoy!

Monday, November 12, 2012

Garlic Lemon Thyme Roasted Shrimp


This weekend, Yvonne and I had the pleasure of catering appetizers and desserts for a very special event. We made several of our stand-by recipes that we've shared on our blog such as these Cremini Mushroom and Feta Crostini, Roasted Jalapeno Hummus and Lemon Tarts. Today, I'm sharing the recipe for the Garlic Lemon Thyme Roasted Shrimp. This is a fresh, simple, versatile appetizer that can be served warm or room temperature. Place them on skewers or family-style on a platter with a side of dipping sauce of your choice. We served them with a Chimichirri Sauce which is basically a slightly chunky fresh herb sauce that pairs well with the garlic, lemon and thyme flavors of the shrimp.

You can also serve this recipe as a meal over pasta. However you choose to serve them, they are delicious!


Garlic Lemon Thyme Roasted Shrimp
Makes 2 lbs (serves approx 20 people as an appetizer or 6 as part of a meal)

Ingredients:
2/3 cup good quality extra virgin olive oil
2 lemons zested then sliced into thin slices
5-6 springs fresh thyme springs, leaves removed
Kosher Salt and Fresh Ground Pepper, to taste
4 tablespoons unsalted butter
6 large garlic cloves, minced
2 lbs large raw shrimp - tail on, cleaned and deveined

Directions:

Preheat oven to 400 degrees farenheit

To a 9x13 glass baking dish, add olive oil, lemon zest and thyme. Season with salt and pepper. Bake in the oven for approx  8-10 minutes, checking and swirling the oil around every few minutes to make sure the oil doesn't get too brown. Remove from the oven once the oil is lightly browned and fragrant. Since oven temps vary, it might not take the full 8-10 minutes to reach this stage.

Remove pan from oven and add butter. Swirl the butter around in the hot oil to melt it, then add shrimp, garlic and sliced lemon (don't squeeze). Toss the shrimp in the mixture to coat.

Return to oven and bake for 8-10 minutes more or until shrimp turns pink and starts to curl which is the indication that they're done. Don't overcook.

Remove from oven and serve on a platter garnished with lemon slices, chopped fresh parsley and a sauce of your choice. We used a Chimichirri Sauce which is basically a fresh herb sauce which compliments the garlic, lemon and thyme.

Alternatively, to serve as a meal, place over cooked pasta and garnish with lemon slices and fresh parsley.

Store leftovers refrigerated in an air tight container.

Friday, November 9, 2012

Toffee Chocolate Chip Walnut Cookies

Toffee Chocolate Chip Walnut Cookies

It’s all about cookies today!!  Have you ever had one of those days when you are just craving a cookie!  Well that was me on Wednesday!  I wanted a cookie, but wasn’t in the mood for just a plain chocolate chip cookie, so I hit the pantry again to see what I had… What do I find but a nice bag of Toffee Bits.  If you have never used Toffee Bits in your baked goods, grab a bag!  They are wonderful.  Usually they are more readily available during the holidays.  Faye posted a recipe using them last year called “Insanely Good Salted Toffee Chocolate Bars”. That recipe is addicting! You must try it along with the “TOFFEE CHOCOLATE CHIP WALNUT COOKIES” J!   So I decided to make a cookie using the Toffee Bits, Chocolate Chips and Walnuts. I love nuts in cookies. Funny, that is one ingredient that people vary on… nuts or no nuts in cookies.  I’m a nut person, but I bet they are just as wonderful without them. Back to the cookies, these cookies are soft, sweet , delicious and super easy to make!!.  The Toffee Bits give the cookie a wonderful sweet and salty flavor.  Since they melt a bit, they keep the cookies nice and soft even till the next day.  Definitely satisfied my cookie craving!  I hope you give them a try.


Ingredients
2 ¼ cups All Purpose Flour
1 teaspoon Baking Soda
½ teaspoon Salt
½ cup Unsalted Butter (softened)
¾ cup Granulated Sugar
¾ cup Light Brown Sugar
1 teaspoon Vanilla Extract
2 eggs (room temp)
1 cup Toffee Bits (Heath sell a bag that is usually by the chocolate chips.  You find it during the holidays)
½ cup Chocolate Chips
½ chopped Walnuts (optional)

Preheat oven to 350  (makes about 30 cookies)
1.       Add a piece of parchment paper to your cookie sheet. (Trust me, it worth the extra buy on the parchment paper so the cookies do not stick to your cookie sheet due to the sugar in the toffee.
2.       In a medium size bowl, combine flour, baking soda and salt.  Using a whisk, mix and set aside.

3.       In a large bowl, using an electric hand mixer, cream together the butter and both sugars.  Beat till combined and creamy. Add the vanilla and eggs. Beat till combined, but do not over beat.

4.       Gradually add the flour mixture to the egg mixture, beat until all flour has been incorporated.
5.       Mix in the Toffee Bits, chocolate chips and walnuts in a bowl.  

6.       Add the toffee mixture to cookie dough, stir in with a spoon till all mixed in.

7.       Using an ice cream scoop, make cookie dough ball and put on to cookie sheet with parchment paper.

8.       Bake for about 10-11 minutes.
9.       Cool on cookie sheet for about 2 minutes, then transfer to cooling rack.

 
10.   ENJOY!!!

Friday, November 2, 2012

MINI CHOCOLATE CHIP COOKIE CHEESECAKES for an occasion!!


MINI CHOCOLATE CHIP COOKIE CHEESECAKES for an occasion!!


If you like cheesecake and love homemade chocolate chip cookies, you need to give this recipe a try!  It was delicious!  The chocolate chip cookie is the base of this wonderful mini cheesecake.  I have to say I was skeptical until I did the first batch, then I was HOOKED!!   And the best part is this recipe is perfect for any occasion.   In the last month, I have made this recipe three times.  1st time was for a baby shower, 2nd time my sisters birthday and the 3rd time , they were featured as  one of the many desserts Faye and provided for my annual Halloween party.  So I guess you can say this Mini Chocolate Chip Cookie Cheesecakes has gone through three test runs and each time it was just as good and a hit at each party! Another advantage to the recipe is you can make the cookie base a few days before your actually going to make the recipe. In addition, once the Mini Chocolate Chip Cookie Cheesecakes are done, you can store them in a air tight container for 2-3 day before you even serve them.Then just top off with fresh whipped cream and sprinkle mini chocolate chips on top. If you planning a party and want a show stopping dessert , this is the perfect dessert to serve.

Happy Cooking!


INGREDIENTS FOR THE COOKIE
1 cup butter (soften)
¾ cup Brown Sugar
¾ cup white sugar
2 teaspoons vanilla
2 large eggs (room temperature, lightly beaten)
2 ½ cups flour
1 teaspoon baking soda
1 teaspoon salt
2 cups of semi-sweet chocolate chips


INGREDIANTS FOR CHEESECAKE
4 packs of cream cheese (8oz each) (soften)
2 (14oz) cans of sweetened condensed milk (NOT evaporated milk)
4 large eggs (room temperature)
1 tablespoon vanilla

TOPPING
3 cups of Heavy cream
1/3 cup confectioners sugar
1 teaspoon vanilla
1 cup for mini chocolate chips (for decorating)

Saran wrap
48 aluminum muffin wrapper
Wax paper
Muffin trays
Spray oil (like Pam)
---------------------------------

Cookie Dough
1. Recommend you make the cookie dough, 1 or 2 day before you plan to make the cheesecakes. It will save you a lot of time.
1. Whisk together the flour, baking soda and salt. Set aside.
2. In a large bowl, beat the cup of butter with brown and white sugar until it is fluffy.
3. Add the vanilla and  beaten eggs.
4. Slowly beat in the flour mixture that you had set aside. Do not over beat. One its incorporated, stop.
5. Stir in 2 cups of semi chocolate chips.
6.  Divide the dough into two parts.  Lay out two large pieces of saran wrap, pour  half the chocolate dough on each piece, wrap as a log.

7. Put into Freezer for at least 1 hour or overnight.
8. Once you ready to start and dough has been chilled, preheat oven to 325 degrees
9. Line 48 muffin cups ( I used 2 pan which is 24 muffin, then reused the pans for a total of 48 mini cheesecakes), Spray with spray oil (like PAM)
10. Take one of the cookie dough logs and chop the dough.  It should be enough to fill 24 cups in one log. You just add a couple pieces into each cup.

11.Bake for 10 minutes  Cookie will spread on the muffin cup. Remove from oven as you make the filling


FILLING
1. While the cookies are baking , make the filling. In a large bowl, mix cream cheese, sweetened condensed milk till it is creamy.   Slowly add in the sweetened condensed milk one can at a time.  Mix in the vanilla at the end.

2. Using a 1 tablespoon measurement, pour 2-3 tablespoons into each muffin cup over the baked cookie.

3. Bake for another 15 minutes.
4. Remove from oven and Cool for 15 minute .Then remove each individual cup from muffin pan and place on wire rack to cook.

5. Repeat the whole process using the second cookie dough log.
6. Once all the mini cheesecakes have cooled,  remove the aluminum cups and place each mini cheesecake  into a large plastic Tupperware lined with wax paper and put in the refrigerator until you are ready to use.

TOPPING.
1.once you are ready to serve.  Whip the cream , confectioners sugar and vanilla in your kitchen add with the whisk attachment (or you hand mixer).  Beat until it forms soft peaks.
2. Put whipped cream into a large ziplock bag, cut the tip and a decorating tip ( you do not have one, that is ok, just use the bag without the metal tip).  Decorate the top of each mini cheesecake with whipped cream and then sprinkle with mini chocolate chips. Serve.
Enjoy!!