Thursday, August 30, 2012

Hatch Chile Chorizo Frittata


 It's Hatch Chile season! Hatch Chiles are grown in New Mexico and are only available 6 weeks out of the year so get them while you can...
 
Since Chorizo and Chiles are such a great combination, and breakfast is my favorite meal, I decided to combine them into this delicious breakfast Frittata.


Hatch Chile and Chorizo Frittata
Serves 4

Ingredients:
5 - 7 large hatch chiles (depending on size)
1 tomato diced (I used a Roma tomato)
4 large eggs
1/2 cup milk
3 green onions, chopped
3 cloves of garlic, minced
6 ounces of pork chorizo
1/2 teaspoon chili powder
1/2 teaspoon chipotle chile powder (I ran out of chipotle chile powder so I used Ancho. It was spicy! But my family loved it...)
1 cup shredded cheese (I used a combination of Colby and Monterey Jack)
Salt & pepper to taste

Directions:

Preheat oven to 350F

Roast the chiles until they are  blackened on all sides by placing them directly on your burner over low heat or under the broiler. Here are instructions for roasting in the broiler.


Place the chiles in a plastic storage bag and seal the bag to allow them to steam. Set aside for 15 minutes. This makes it easier to remove the skin.

After 15 minutes, remove from the bag and place on a cutting board. Remove the skin by running a knife along the outside.

Slice off the top of each chile and slice open. Remove the seeds (or as much of them as possible).


In a medium bowl, whisk together the eggs, milk, spices and salt and pepper. Set aside.


In a medium size oven proof skillet (mine was 10"), heat 1 tablespoon of canola oil. Saute the green onions and garlic. Add the chorizo and tomatoes and cook until fully cooked and the fat from the chorizo has rendered down.

 
Remove the chorizo mixture from the skillet and wipe out the skillet.

Spray the same skillet with nonstick cooking spray. Place a single layer of the hatch chiles in the skillet. Spread half of the chorizo mixture over the chiles and top with half of the cheese.

Repeat the layering process one more time.


Pour the egg mixture into the skillet, distributing as evenly as possible.


Bake in the oven for approximately 25 minutes or until the eggs are set in the center and no longer jiggly.


Remove from oven and allow to cool for 10-15 minutes before serving. Serve warm.


Store any leftovers tightly wrapped in the refrigerator for up to 1 day. Reheat in the microwave.


Note: I've read that some Hatch Chiles can be spicier than others and the only way to tell is by tasting them so I recommend doing a little taste test on your chiles before determing how many you want to use. Also, if Hatch Chiles are no longer in season, you can still enjoy this recipe using any other mild chile (anaheim or poblano are good substitutes).

Source: Adapted from Daisy's World


Monday, August 27, 2012

Lemon Tarts for a Very Special Bake Sale

"..all that is really worth the doing is what we do for others" ~Lewis Carroll

Yesterday Yvonne and I got together to make some baked goods for a Bake Sale being held at her work to benefit the family of a very special person, Bryce Halbert.

I was imagining we would bake a few items and be done within a few hours (ha!). In typical "LiveBakeLove" fashion, and with Yvonne in her trademark experimental mode, we wound up baking more than expected; cute Peanut Butter Cookies topped with Raspberry Jam in the shape of a heart, delicious Peach Bread w/ Pecan Crumble Topping, gorgeous Lemon Tarts w/Cream Cheese Crust and Candied Lemon Slices, yummy Lemon Blueberry Bread w/Fresh Lemon Glaze and creamy Mango Tarts topped w/Fresh Blueberries.

The set up for the Bake Sale at LJG was pretty amazing and humbling with so many people contributing to the event...

****update***Its amazing what people joining together with a little flour, butter and sugar can do for a a good cause.  The  company bakers raised $520.00 for the Halbert Family Trust today. I know it will not bring back the husband, father and all around great guy,  but we hope our contribution helps the grieving family.  LJG VP. Tunia Kaawa, matched the amount made at the sale so the family will get over $1000.00. LIVEBAKELOVE is very proud to have been able to help where we could. *****

To make your donation to the Halbert Family Trust Fund, please use this link
  
 Today we're sharing the recipe for these Lemon Tarts with Cream Cheese Crust and Candied Lemon Slices which had to be my favorite dessert of the day. The cream cheese in the crust makes it so tender and flaky and the filling (which is super easy to make), had just the right balance of tart & sweet. The candied lemon slices were not only for visual appeal, they are completely edible and totally delicious!


Lemon Tarts
Makes 12 "muffin" size tarts
Adapted from King Arthur Flour

Crust Ingredients:
6 ounces cream cheese, softened
12 tablespoons (a stick and a half) unsalted butter
2 teaspoons granulated sugar
1/2 teaspoon salt
1 1/2 cup All Purpose Flour

Filling Ingredients:
1 tablespoon lemon zest
1/2 cup fresh lemon juice (around 3 lemons)
1 cup granulated sugar
3 large eggs
1/3 cup sour cream

Candied Lemon Ingredients:
1 small lemon cut into 1/4" thick half moon slices
1 cup granulated sugar
1/2 cup water

Directions:

Make the crust:

Using an electric hand mixer or stand mixer fitted with the paddle attachment, mix together the cream cheese, butter, sugar and salt. Add the flour and mix gently until dough is completely combined and cohesive.


Remove from bowl and shape into a 1" thick disk, wrap in plastic and refrigerate for a minimum of 1 hour.

Make the filling:

In a large bowl using a hand mixer or a stand mixer fitted with the whisk attachment, whisk together the lemon juice, zest and sugar. Whisk in the eggs until completely combined then whisk in the sour cream until completely combined and smooth with no lumps.

Make the candied lemon slices:

In a saucepan or small skillet, combine 1 cup of sugar with 1/2 cup of water.

Bring to a simmer over medium-low heat. Carefully add the lemon slices. Simmer 3-4 minutes each side.


Carefully remove slices and place on parchment paper or wax paper.

Note: You'll probably have more candied lemon slices than you need for the tarts. The leftovers would be delicious in unsweetened iced tea!

Assemble the tarts:

Preheat oven to 375F

Remove the dough from the refrigerator and roll out onto a lightly floured surface into a 1/8" circle.

Using a biscuit cutter or any other cutting device as your template (we used a 3 1/2" fluted tart pan) cut into 12 pieces, reshaping and rerolling the dough scraps as needed.


Lightly spray your baking pan. Transfer the dough circles to the baking pan and gently press them into the pan being careful not to stretch the dough.

Pour the filling into each tart shell distributing evenly and filling nearly full.

Talk about "fitting a round peg into a square hole"...even though Yvonne cut the dough into circles, they actually worked perfectly with this square pan that she found at Marshalls. Ingenuity in the kitchen at its' finest! And the scalloped edges are so pretty...


Bake until the crust is golden brown and the filling is set. Baking time will depend upon the size of the pan you use;  regular muffin size tarts take approx 28-30 minutes.

Remove from oven and top with the candied lemon slices.

Allow to cool for 10 minutes before removing from pan. Remove from pan and allow to cool completely.


Lemon Tarts cooling next to our Coconut Cake w/Mango Filling (recipe coming soon....)

Serve when completely cool or refrigerate before serving.

Store leftovers refrigerated for up to 2 days.


Bake Sale Packaging Tips:

We've found that nice packaging of your baked goods for Bake Sales really helps with the presentation. We like to pick up cute bags, ribbon and disposable baking pans whenever we find them on sale.


The Peach Bread was baked in disposable paper tube pans then placed in a large ziploc bag (with the top cut off), then tied with a nice ribbon. The Peanut Butter Cookies were stacked on top of heart shaped paper doiles then placed in cellophane bags and tied with baking twine.


Thursday, August 23, 2012

All about Mangos….MANGO CARROT BREAD

All about Mangos….MANGO CARROT BREAD


Let me start by saying, we are having a huge heat wave in Southern California,  so the last thing I wanted to do was to heat up my oven, but for the sake of the blog ….. and my sweet tooth … I caved and cranked it up last Sunday.  I crawled out of bed at 6 a.m. to make this recipe.  It is amazing how creative you can be in the early morning once you’ve had a good cup of coffee.  

During the move a few weeks ago I came across a pile of recipes I had set aside - thinking I’d try them someday.  I also had a few bunches of carrots left over from the week before and really wanted to use them.  I had seen a bread recipe in that pile and honestly, I cannot tell you where it came from since it was typed out.  I had saved it because the concept sounded interesting - Banana Carrot Bread.  Once I started taking inventory of my available ingredients, I only had one problem.  It was 6 A.M. ….I had no bananas and there was no way I was going to get dressed and go to the store that early! This is where the creative juices kicked in.  I did have this huge, juicy mango and thought, if mashed, the mango should have a similar texture to banana.  Mangos are probably right at the top of my list of favorite fruits.  Tangy and sweet - perfection in a bite.  After pureeing, it worked perfectly. I changed the recipe up quite a bit, but I have to tell you that this bread is DELICIOUS!!!   The bread is moist and sweet and has great texture from the half cup of homemade granola I threw in there. Who would have thought mangos and carrots would mix so wonderfully together?  It’s true - great flavors. You can eat it cold or right out of the oven with a little butter.  I hope you try this MANGO CARROT BREAD.

Happy Cooking Everyone!

(TIP: for good granola, if you don’t have the time to make your own, check out your local breakfast place - many of them sell homemade granola.


Ingredients
--------------
1 cup Mango puree (1 big one, or 2 medium size)
1 cup sugar
½ canola oil
¼ melted butter
2 eggs
2 cups flour
1 ½ teaspoon baking soda
½ teaspoon baking powder
1 teaspoon cinnamon
¼ teaspoon nutmeg
½ teaspoon salt
1 cup grated carrot (about 3-4 large carrots)
½ cup chopped assorted nuts
½ cup home made granola


Directions
Pre-heat oven to 350 degrees

1. Spray & flour a (9x5x2) loaf pan. Set aside.
2. Peel mango and puree in food processor.  Set aside.


3. Grate 1 cup of carrots.  Set aside.

4. Chop 1/2 cut of assorted nuts.Set aside.


5. Combine sugar, eggs, oil and butter. Mix with a whisk till smooth.


6. Add pureed mango. Mix till well blended.


7. In a separate bowl, combine flour, baking soda, baking powder, cinnamon, nutmeg and salt. Stir until all ingredients are incorporated.
8. Add Dry mix to the Wet mix, stirring with a spoon.


9. Add carrots, nuts, granola and vanilla.  Mix with spoon.

10. Pour mixture into prepared pan.

11. Bake at 350 for 50-60 minutes, until middle is fully cooked.


Monday, August 20, 2012

Super Moist, Super Easy, Super Delicious Banana Cake with Vanilla Bean Frosting

I've made lots of desserts with bananas but truthfully I've never baked a banana cake. I saw this amazing picture on Pinterest of a multi-layered Banana Chocolate Chip Cake, but I wasn't in the mood to make a fussy layer cake. I wanted something more simple; something I could just whip up by hand, bake, frost and be done. This recipe is fast, easy and definitely delivers the banana flavor. The cake is super moist and the vanilla bean frosting compliments it perfectly. This is the perfect slice of Banana Cake....


Don't you wanna take a bite....


Super Moist, Super Easy, Super Delicious Banana Cake with Creamy Vanilla Bean Frosting
Adapted from Butteryum
Makes one 8x8 or 9x9 cake
Serves 8-9

Cake Ingredients:
2 over ripe bananas, mashed (about 3/4 cup)
**make sure you use OVER ripe bananas, you want them to be almost black, this is key to the banana flavor in this cake
2/3 cup granulated sugar
1/2 cup sour cream, room temperature
1 egg, room temperature
2 tablespoons unsalted butter, softened
1 teaspoon vanilla extract
1 cup all purpose flour
1/4 teaspoon salt
1/2 teaspoon baking soda

Frosting Ingredients:
2 tablespoons unsalted butter, softened
1/4 cup heavy cream or milk
1/2 teaspoon vanilla bean paste (or vanilla extract)
1  1/4 cup powdered sugar (or more to reach desired consistency)

Directions:

Preheat oven to 375F if using a light colored pan. If using a dark colored pan or glass, reduce temp to 350F

Spray an 8x8 or 9x9" square baking pan with nonstick spray. I recommend using an 8x8 pan if you have one for a taller cake. My pan was 9x9.

In a small bowl, combine the flour, baking soda and salt and whisk together to combine.

In a large bowl using a whisk, cream together the sugar, sour cream, egg and softened butter.


Add the mashed bananas and vanilla extract and whisk to combine.


Add flour mixture and whisk just until combined.


Pour batter into prepared pan and spread into an even layer.


Bake for 20-25 minutes or until toothpick inserted in center comes out clean. Start checking for doneness at the beginning of the bake time and do not overbake.


Make your Frosting:

In a large bowl, whisk together the softened butter and powdered sugar until smooth. Drizzle in the heavy cream, whisking until smooth. Stir in the vanilla bean paste until fully incorporated. Adjust consistency to your liking by adding more powdered sugar if needed.
Spread frosting over the cooled cake.


For easier frosting and slicing, I removed the cake from the pan and placed it on a cutting board once it was cool enough to remove without breaking.


Check out all of the beautiful flecks from the vanilla bean paste...


This cake is so good, you'll want to have a slice immediately after frosting....


And another....


And another....


Store leftovers (if any) at room temperature tightly covered for up to 2 days.

Thursday, August 16, 2012

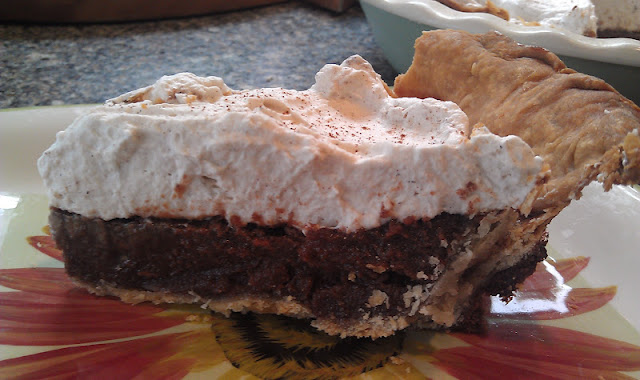
THANK YOU! Chocolate-Cinnamon Pie

THANK YOU! Chocolate-Cinnamon Pie

           w/ cinnamon whipped cream


Moving…I have to say, tops the list as one of the worst activities we have to do!  Yet we all have to do it at some point in our lives.  This time, it was my turn …. trust me when I say I hope I never have to move again.  Oh yes, I took time off work, I labeled boxes and organized as quickly as I could, but there are still missing boxes and broken glasses….and my back is killing me. But on the bright side …. I love my new house! 

One of the things about cooking is that most of us are inspired by our kitchen.  I have to admit, my last kitchen didn’t do much to inspire me, but I was still able to create some amazing desserts and savory dishes. Well, now I have a kitchen that is a little bigger with a whole lot of natural light! I love it!!!  So, the first creation from my new kitchen will be a “thank you for helping us move peeps”.   I thanked them the only way I know how - I baked J!  
I have been wanting to make a chocolate pie ever since watching Minny dish up her famous chocolate pie in ‘The Help’.  Well …. maybe not Minny’s “special pie”, but certainly Minny’s award-winning pie!  I gave my Chocolate pie a little Mexican twist by adding what I consider to be chocolate’s best spice compliment -  Cinnamon!  I had always wondered about the Chocolate pie and let me tell you… it was delicious and super easy to make.  The cinnamon whipped cream just finished off the amazing flavors.  I hope you all give this recipe a try.   Maybe you need to do some “thank you baking” too. 

Happy Cooking everyone!

          Ingredients

PIE
----
1 pre-made pie crust
1 ¼ sugar
3 tablespoons cocoa powder
1 tablespoon flour
½ teaspoon cinnamon
4 tablespoons melted butter
2 beaten eggs
¾ cup evaporated milk (not sweetened condensed milk)
¼ cup half and half
1 teaspoon vanilla

WHIPPED CREAM
------------------
1 cup whipping cream
½ teaspoon cinnamon
1 teaspoon vanilla
3 tablespoons powder sugar

-------------
1. Preheat oven to 350 degrees.
2. Lay pie dough over a 9 inch pie pan. Crimp the edges.  Poke bottom with a fork, about 4 times.
3. Line the crust with foil, adding weights to hold it down. While many people use dried beans - I actually had some rocks that worked perfectly.
4. Bake for 15 minutes with the weights, then remove pan from oven. Remove the foil and weights, being careful not to burn yourself.
5. Put the crust back into the oven and bake for 5 minutes.  Remove from oven and set aside.
6. For the filling: combine sugar, cocoa, flour and cinnamon in a large bowl. Mix well.  Make a well in the center of the dry mix and set aside.
7. In a separate bowl, combine butter, beaten eggs, evaporated milk, half and half and vanilla.  Mix with a whisk until all the ingredients are well incorporated.
8. Pour the wet ingredients into the ‘well’ of the dry ingredients.  Using a large spoon, mix until smooth.
                              (Chocolate goodness!!!!)


9. Pour chocolate mixture into the pie crust and bake for 50-60 minutes.  The sides should be set but the middle will wiggle a little bit - that’s OK.
10. Remove from oven and set aside until completely cool. (approx. 1-2 hours).
  
11. Once the pie is cool,  you can make the whipped cream.  Combine whipping cream till it is soft peaks.   Add cinnamon and vanilla.  Beat at medium to high speed, until stiff peaks form.


12. Top pie with the cinnamon whipped cream. Refrigerate overnight.


It’s worth the wait!!! Delicious!


You know its good, when you left with only one piece and you just made the pie :-)