Wednesday, September 25, 2013

What It Means to Me to Have a Food Blog


"I love this blog". That's not something I say out of vanity, but I do. I love it. I don't think of it as a job or a chore or look at it as something I "have" to do. I do it because I truly love it. I wake up every morning wanting to bake and I never run out of inspiration. I look forward to posting recipes and I get excited about every single recipe I share. I seriously can't wait to share these recipes and I want others to enjoy them as much as I do. Sure, I know there are millions of other Food Blogs out there so what makes this one different or special? Because it's us, simply put.
 
When Yvonne and I started Live Bake Love 2 years ago, I wasn't sure what to expect. Immediate success? Didn't happen. Tons of support from friends and family who love our baking? That didn't happen either. Open-armed acceptance into the blogging community? Eh...not. But something unexpected did happen. I never in a million years expected to love it so much. True, I do think about stopping (almost on a daily basis) especially when frustration sets in and you feel like you're talking to crickets, but then I remember the people who actually try the recipes and love them. I remember the person who commented that we inspired her to dust off her rusty baking pans and bake again. I remember the reasons I started. They are the reasons I continue... and because I know one day I will leave this world knowing that I put a piece of myself out there into the universe that is a true representation of me...a girl who loves to bake.

Someone I admire greatly in the Food Blogging community summed my love of baking up better than I ever could. He said "we cook out of necessity, but we bake out of love". And if you think about it, it's true.

So whether you've been following us at LiveBakeLove for a while or are just now reading your first post, I hope you continue with us for many more years to come.

Now, I firmly believe all good things should end with food, so I'm leaving you with the links to a few of my favorite posts from the past 2 years. I think they really capture the spirit of LiveBakeLove...


We were so excited to participate in the National Food Bloggers Bake Sale (click here) that we participated for a second time this year!


I auctioned off a Blueberry Coconut Almond Crumb Cake for Cookies for Cody to raise money for a sweet little boy in Texas who was battling a rare form of cancer (click here to read about it) and when Cody passed away I paid tribute by baking the lightest oven baked berry pancake you ever will eat (click here for the recipe).

Yvonne's authentic family recipes are priceless and always at the top of my list. Nothing beats her Mom's homemade flour tortillas and her Empanadas. Learn how to make her Empanadas straight from the pro herself here.


One of our favorite annual events is definitely our Christmas Cookie bake. We bake a whole lotta cookies and have a whole lotta fun! Stay tuned for this year's Cookie Bake. There's sure to be some fun in store!


Cheers everyone & Happy 2-year Blogiversary to us!!

Monday, September 23, 2013

Friendship cupcakes:Raspberry Cupcakes with Lemon frosting


Baking as a form of expression is one of my favorite ways to say thank you. Recently, I want thank two special women who have been very helpful so I went to the kitchen to see what I would come up with. After searching the ingredients I had to work with, I came up with this combination - lemons from my parent's tree and raspberries from the local farmers market, a perfect combination for these Raspberry Cupcakes with Lemon frosting! I found this recipe for Raspberry Cupcakes and the frosting was an adaptation from my Banana Boat Cupcake frosting recipe.  This recipe came out exactly the way I wanted, fresh, sweet and tart.  The cake is perfect, not too dense. And the frosting is light with bright lemon flavor.  
 
I hope you give this recipe a try.
Happy Cooking everyone!

Friendship Cupcakes: Raspberry Cupcakes with Lemon Frosting
Makes 1 dozen cupcakes

Cupcake Ingredients:
2 1/3  cup Flour 
1 tablespoon baking powder
¾ teaspoon salt
1 ¼ cup sugar
½ cup vegetable oil
2 large eggs (beaten)
1 teaspoon vanilla extract
1 ½ cup whole milk
1/3 cup pureed fresh raspberries

Frosting Ingredients:
1 cup of unsalted butter (softened)
1 vanilla bean (scraped)
1 teaspoon fresh lemon zest
1 tablespoon lemon juice
1-7 oz jar Marshmallow Cream
2 cups powdered sugar
¼ cup half and half milk or whole milk
12 raspberries for decorating

Prep Work:
1. Preheat oven 325 degrees
2. Line cupcake pan with 12 liners. (I prefer the ones that have the aluminum interior)
3. Take about ½ cup of fresh raspberries and puree them using a fork and small bowl.  Set aside

Recipe
1.  In a medium bowl, sift together the flour, baking powder, salt and sugar. Using a mixer, slowly add oil until the mixture looks crumbly. 
2. Add eggs, milk, vanilla and pureed raspberries to flour mixture. Beat for 2-3 minutes.
3. Fill each cupcake liner with raspberry batter till its about ¾ filled.
4. Bake for 20 minutes or until toothpick inserted in center comes out clean.


FROSTING:
1. Beat butter until it is smooth.
2. Add vanilla ,lemon zest, lemon juice and marshmallow cream and mix until combined.
3. Gradually add powdered sugar at low speed.
4. Add half and half milk or milk and beat at high speed till nice and fluffy.
5. Place frosting in a pastry bag fitted with a decorating tip or in a plastic storage bag with the corner cut off. Frost as desired.
F. Garnish each cupcake with a fresh Raspberry.


Enjoy!

Wednesday, September 18, 2013

Coconut Banana Granola Crunch Muffins

Muffins have to be one of my favorite breakfast treats and these Coconut Banana Granola Crunch Muffins are on the top of my list. Big, moist, not overly sweet with pecans and a crispy coconut topping. Did I mention they were big? The banana flavor is pretty subtle due to the small amount of mashed banana, but the chunks of banana are a great touch.
 
I like to bake my muffins in the paper Panettone molds. They really make a nice presentation and make the muffins look that much more special. As if the delicious flavor wasn't enough....

For more information on the Panettone paper molds, see my post on baking amazing bakery style muffins here.


Coconut Banana Granola Crunch Muffins
Makes 6-7 jumbo size muffins
Adapted from Spoonful of Flavor

Ingredients:
1 1/2 cups all purpose flour
1 cup granulated sugar
1 tsp baking powder
1/2 tsp baking soda
1/4 tsp salt
1/2 cup unsalted butter, melted and cooled
1 large egg, room temp lightly beaten
1 tsp vanilla extract
1/4 cup + 2 tablespoons milk
1/2 cup mashed over-ripe banana
1/2 cup chopped banana
1/2 cup diced pecans
1/2 cup granola (I used Oats & Honey flavor)
1/2 cup sweetened flaked coconut + more for topping

Directions:

Preheat oven to 350f

Place 6-7 Panettone paper cups on a rimmed baking sheet. Spray the interior of each cup very lightly with non-stick cooking spray. If you do not have the paper molds, either spray your muffin pan with nonstick spray or line with standard size paper liners. Either way, the muffins will still be delicious!


In the bowl of your stand mixer fitted with the paddle attachment, combine flour, sugar, baking powder, baking soda, and salt. Mix to combine.

Add the melted butter and mix on low speed until combined.

Add egg, milk, vanilla extract and mashed banana. Mix on low speed until combined.

Fold in the diced banana, granola and 1/2 cup coconut using a spoon or rubber spatula.

Use a cookie scoop to divide the batter evenly between the cups, filling almost 3/4 full.

Sprinkle with additional coconut and granola if desired.

Bake 20-25 minutes or until toothpick inserted in center comes out clean. Do not overbake.

Remove from oven and place on wire cooling rack to cool.


Enjoy! Store leftovers in an airtight container for up to 1 day.


Monday, September 16, 2013

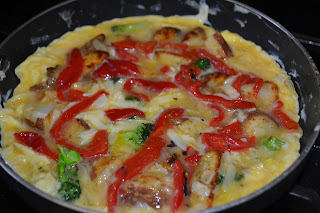
Roasted Bell Pepper, Red Potato, Broccoli and Provolone Frittata for Two

Not only are Frittatas delicious, but they're a great way to use up leftover meat, veggies and cheese. They really are a versatile dish and can be enjoyed any time of day, breakfast, lunch or dinner! They're the perfect dish to serve for Brunch or overnight guests because they can be made ahead of time and don't have to be served hot. I like to make them on Sunday mornings while I'm enjoying my first cup of coffee served with homemade biscuits fresh out of the oven, fresh fruit and a side of bacon or sausage (if there's no meat in the frittata).
 
This morning I made a Roasted Red Potato, Roasted Red Bell Pepper, Broccoli and Sharp Provolone Frittatta just for two! The Roasted Red Potatoes were frozen so I baked those in the oven before adding to the Frittata. I also sautéed the Broccoli until tender-crisp to achieve the desired texture.
 
For more Frittata ideas, check out these other delicious LiveBakeLove Frittata recipes:


Roasted Red Pepper, Potato, Broccoli and Provolone Frittata for 2

Ingredients:
5 eggs
2 tablespoons milk
salt & pepper to taste
1/4 cup grated cheese (I used sharp provolone)
1/2 cup coarsely chopped broccoli florets
1/4 cup roasted red bell pepper, sliced
3/4 cup roasted red potatoes, coarsely chopped


** If you'd like to add meat to this dish, some cooked Italian Sausage would be great. Just cook it in the same skillet before cooking the broccoli. Or just serve meat on the side like I did!
 

Directions:

Turn oven to broil

Add eggs, milk, salt and pepper to a medium bowl and whisk to combine. Add cheese.

Add 2 tablespoons Olive Oil and 1 tablespoon butter to a small oven proof skillet (mine was 6") over medium-low heat. Add broccoli, season with salt and pepper and sauté until crisp, tender about 1 min. Tip: Most skillets are oven proof. If yours has a plastic handle, cover in a few layers of foil before placing in the oven.


Add the sliced red pepper and chopped potato to the skillet making sure they are evenly distributed.


Pour in the egg mixture and cook over low heat until eggs are almost set. During the cooking process, run your rubber spatula along the edges to pull the cooked egg slightly towards the center and allow the uncooked egg to flow to the edge.


When eggs are just about set, place the pan in the broiler and cook until puffy and completely set. Don't overcook or your eggs will be tough.


Remove from oven and allow to set for 15 minutes.

Serve warm or at room temperature. Any leftovers can be stored in an air tight container in the fridge and reheated for a few seconds in the microwave.


Saturday, September 14, 2013

"Best of Summer" Pie and My Favorite Pie Crust Recipe

Since Summer seems to be far from over here in San Diego, I was inspired this weekend to take some of my favorite Summer fruit (peaches, nectarines and blueberries) and bake them into a pie. For me, pie is the ultimate Summer dessert. It's relatively easy to make, portable (take it to a party, barbecue or potluck) and you just feel good eating it!

This also gives me the perfect opportunity to share my favorite pie crust recipe with you. I've tested several pie crust recipes - all butter, all shortening, a combination of butter and shortening, but to me the all butter recipe wins hands down. You just can't beat the taste of butter. Butter really is better. While some may believe you need shortening to achieve the flaky texture that everyone loves, you really don't as long as you remember the 3 important rules for good pie crust - keep your ingredients cold, don't overwork your dough and use proper techniques. After a lot of testing, this recipe and method from Inspired Taste (via Cooks Illustrated) worked best for me. I love that it's made in the Food Processor which gives you consistent results. When it comes to research, you really can't beat Cooks Illustrated. They really get behind the science of why certain recipes and techniques work and they do all the research for you!

Click here for my favorite pie crust recipe.
 
Check out all the marbling in the dough...when the heat from the oven hits the moisture from the butter, it creates steam which results in a flaky c.rust
 
 
Now on to this delicious pie. The combination of peaches, nectarines and blueberries really is a winner, but feel free to use your favorite Summer fruit. The crust, as promised, is golden, buttery and flaky. I hope you'll give this "Best of Summer" Pie recipe a try!


"Best of Summer" Peach Nectarine Blueberry Pie
3 large peaches, peeled and sliced into 1/4" slices
2 large nectaries, peeled and sliced into 1/4" slices
3/4 cup fresh blueberries, washed and dried
1/4 cup brown sugar*
2 1/2 tablespoons all purpose flour
1 teaspoon cinnamon
1/2 teaspoon nutmeg
Zest and juice from half of a fresh lemon
1 tablespoon unsalted butter, cut into small pieces
1 double crust pie crust
egg wash (1 egg beaten with 1 tablespoon cold water)
Sugar in the Raw for sprinkling on crust
* increase amount of brown sugar if your fruit isn't very sweet

Directions:

Place all of the fruit into a large bowl. Add the brown sugar, flour, cinnamon and nutmeg. Toss with a rubber spatula to coat. Add the lemon zest and juice and toss again. Set aside. Tip: Don't use fruit that is overly ripe or it will get too mushy during baking. Adding fresh lemon zest and juice to fruit fillings brightens the flavor of the fruit


Crack the egg into a small bowl or ramekin. Add 1 tablespoon cold water and whisk with a fork to combine. Set aside.

Roll out one disk of pie dough on a well floured surface. Carefully place into pie pan. Arrange the fruit mixture on top. Make sure the fruit is distributed as evenly as possible. Tuck the small chunks of butter into the filling.


Roll out the top crust and place on top of the fruit filling. Trim if needed, then fold under the edges of the bottom crust and crimp to seal and create a decorative border.


Place the pie in the refrigerator for 15 minutes. Tip: This gives the dough time to chill and relax.

While the pie is chilling, preheat oven to 400f and place a rimmed baking sheet in the oven to preheat it. Tip:  Preheating the baking sheet helps to bake the bottom crust. No soggy bottoms here!

After 15 minutes, remove the pie from the refrigerator and brush lightly and evenly with egg wash. Sprinkle crust with sugar and cut a few vent holes in the top. Tip: Brushing with egg wash and sprinking with sugar helps to create a golden crust and add sweetness and texture.


Place the pie on the preheated baking sheet in the oven. Bake at 400f for 15 minutes then reduce oven temperature to 350. Bake for another 45-50 minutes or until filling is hot and bubbly. Cover the edges of the pie crust with stripes of foil or a baking shield if the edges start to get too brown before it's ready to remove from the oven.

Remove from oven and allow to cool at least an hour and a half before slicing. This gives the filling time to thicken.


Store at room temperature for 1 day or lightly covered in the refrigerator for 2 days.


Wednesday, September 11, 2013

Gluten Free Vegan Peanut Butter Banana Bread


Faye and I are quite often asked for Gluten Free recipes.  I've been looking around for a good recipe for awhile now. I found this one recently, but thought it was a bit too plain so I improvised the ingredients a bit and gave it a try.  Ok, I love my dairy, flour and butter, but I can honestly say you will not miss a thing in this recipe. It is so darn good I couldn't stop eating it!  The bread is a bit more dense than a traditional banana bread recipe, but trust me it will not stop you from eating it!   It's a perfect snack and your kids would love it.  I think next time I will even leave out the chocolate chips to get more of the banana maple flavor.  I really hope you give this recipe a try, it is so good!!
Happy Cooking!

*** Special Note:  GLUTEN FREE: Please make sure you check the label of your oatmeal to make sure it's Gluten Free. I've learned that  most of them do have small particals of gluten due to cross contamination. If you do not need it to be Gluten Free, any store brand oatmeal will work for this recipe. Here's a helpful link to read more about Gluten Free Oatmeal options. http://celiacdisease.about.com/od/glutenfreegrains/f/Is-Oatmeal-Gluten-Free.htm

VEGAN: If you want to make this recipe Vegan, use a dark chocolate. A good quality chocolate will have pure ingredients and no additives or just use Carob chips. Here's a helpful link to read more about Vegan chocolate options. http://vegetarian.about.com/od/shoppingproducts/f/veganchocolate.htm

Gluten Free Vegan Peanut Butter Banana Bread

Ingredients:
  • 2 1/2 cups Old Fashioned Oatmeal
  • 1 cup mashed ripe bananas (3 bananas)
  • ½ cup peanut butter
  • ½ cup light brown sugar
  • 2 tsp baking powder
  • ½ tsp cinnamon
  • 4 tablespoons maple syrup
  • 1/2 cup unsweetened shredded coconut
  • 1/2 cup blanched almonds
  • 3/4 cup dark chocolate chips
  • banana slices for garnish if desired

Prep work:
  1. Preheat oven to 350ºF.
  2. Spray a loaf pan with nonstick spray and set aside.
  3. Put oatmeal in a blender or food processor and pulse to a fine crumb. Put into mixing bowl and set aside


Directions:

  1. Take the mixing bowl with the oatmeal crumbs and add all of the remaining ingredients except the  chocolate chips to the blender. Blend until combined.        
                                                                                                                                                                                               
  2. The mixture will be smooth but thick.                                  
                                                                                                      
  3. Fold in 3/4  cup of the chocolate chips.                                
                                                                                                       
  4. Pour batter into prepared loaf pan.
  5. Top with banana slices                                                                      
                                                                                            
  6. Bake  for 30 minutes, until a toothpick comes out clean.      
         
  7.  Cool on cooling rack
  8. EnJoy!!!ENJOY!!!