Monday, January 30, 2012

Cherry lemon Scones

Cherry Lemon Scones

If you have ever had the chance to go to Europe, one of the best traditions I think the English have is their tea times.   A English Teatime usually consist of a nice loose leaf tea with milk and sugar and then a plate filled with sweet scones and savory sandwiches served in the afternoon.  But you do not have to go Europe to try a good English high tea, most large US city offer a high teas(hotels is a good source to check your area).  This brings me to the inspiration for this week’s recipe.  I recently attended a high tea with one of my best friends. We had a wonderful time.  They had these amazing scones made in a heart shape served with a raspberry jam and clotted cream.  If you ever happen to be in the San Juan Capistrano area in California make sure you stop by for a nice treat at The Tea House Restaurant   http://www.theteahouseonlosrios.com/.    Anywise, I couldn’t get the scones of o my mind, so I decided to experience with a recipe I found and bring High Tea home.    And Walla!  Exactly what I wanted and the flavor is amazing.  Sweet and Tart, these Cherry Lemon Scones have just the right amount of sweetness, and are light and fluffy.  The sugary crust as just enough crunch factors!   I served them with some homemade blackberry-raspberry jam and sweeted whipped cream.
Since I was attending a Sunday brunch I brought the scones and a few other breakfast breads.  I was definitely in the baking mood this weekend. Once I start, sometime it is hard to stop since all the ideas start rolling.   I also made a blackberry Coffee cake and a lemon bread.  I am sharing the pictures below; if you would like any of these other recipes before the next posting, just email me. I will gladly send them.
Happy cooking everyone@

Cherry Lemon Scones
2 ½ cups of all purpose flour
3 tablespoons sugar
4 teaspoons baking powder
¼ teaspoon kosher salt
Zest of one large lemon
1/3 cold butter (cut into small pieces)
2 beaten eggs
¾ whipping cream (not heavy cream)
½ cup of dried tart cherries, snipped into small pieces.
¼ cup milk
Turbinado sugar

1.    Preheat oven to 400 degrees. Combine flour, sugar, and baking powder, salt and lemon zest in a large bowl.   Mix with whisk (or , I used the whisk attachment on the kitchen aid.  

2.       Using a pastry blender cut in butter until mixture is a course crumb ( I used the kitchen aid on HIGH, about 2-3 minute). Once the right consistence, make a well in the middle of the bowl and set aside while you work on your wet ingredients.


3.       In a medium size bowl, mix together eggs, whipping cream.  Now stir in the cherries.


4.       Taking the egg mixture put it into the well of the flour mixture. 
 
5.       Stir the egg mixture into the flour using a fork.  Make sure to only incorporate the wet into the dry. The object is not to over mix. 
6.       Take dough and put on a lightly floured surface.  Knead dough gently for about 10-12 strokes, pressing dough down after each stroke . (Since I think the kitchen aid is the best invention ever made for baker, I left the dough in the kitchen aid bowl, put on the knead attachment ((the one that looks like a hook)) and kneaded the dough for about 10-12 turns.  I then transfer the dough to the floury surface and kneaded it just one time). Pat the dough down to form a circle.  You want the circle to be around 8 inches (size of a standard cake pan). Use a rolling pin if you need to, but the dough is pretty flexible so I didn’t need the rolling pin.

7.       Flour a large knife.  Cut dough into 8 wedges.

8.       Place on an ungreased cookie tray and brush with milk.   Sprinkle the Turbinado sugar on each scone.  I used about 1 tablespoon per scone.

9.       Bake for 12-14 minutes at 400 degrees.  Remove from cookie sheet.   Serve warm with jam and whipped cream. Butter is good too!!


Cherry Lemon Scone with jam and whipped cream

blackberrry coffee cake

Lemon Bread
                 

Thursday, January 26, 2012

Banana Walnut Muffins with Brown Sugar Crumble

I know what you're thinking...another banana recipe?? Yep. At some point in the week, every single week, I have 2 or 3 overripe bananas sitting in my kitchen just begging to be put out of their misery. I was raised to believe that wasting food is a crime, so of course I would feel guilty throwing those poor bananas away. I have already shared Flour Bakery's Famous Banana Bread recipe and a Banana Chocolate Chip Espresso Muffin recipe, both of which are absolutely delicious. This recipe for Banana Walnut Muffins with Brown Sugar Crumble topping is another keeper. The muffin is moist and delicious, the crunchy brown sugar topping with a hint of cinnamon adds just the right amount of texture and sweetness. Your house will smell like brown sugar/cinnamon/banana heaven when you bake them. Seriously. And if you bring the muffins to work like I did, you will be tempted by the heavenly aroma  and may arrive with one or two muffins missing. Don't worry no one will know....

If you're debating whether or not to make these muffins the next time you need to use up some overripe bananas, here are some of the responses I received from coworkers: "unreal", "so delicious", "amazing", "I had a tiny mouth orgasm" (now who doesn't like to hear that!).

Banana Walnut Muffins with Brown Sugar Crumble

Muffin Ingredients:

1 1/2 cups all purpose flour
1 teaspoon baking powder
1 teaspoon baking soda
1/2 teaspoon salt
1/4 teaspoon cinnamon
3 large over ripe bananas, mashed
3/4 c granulated sugar
1 egg, lightly beaten
1/2 c unsalted butter, melted
1/2 teaspoon vanilla extract
1 c walnuts, coarsely chopped (optional)


Topping Ingredients:

3 tablespoons unsalted butter, cold cut into pieces
2/3 c lightly packed brown sugar
1/4 teaspoon cinnamon
2 tablespoons all purpose flour


Directions:

Preheat oven to 375 and line a 12 cup muffin pan with paper liners or spray with non-stick spray.

To make the topping: In a small bowl, combine the flour, brown sugar, and cinnamon. Using a pastry cutter (or 2 knives) add the cold butter chunks and cut in until blended and crumbly and no large chunks of butter remain. It's important to keep the topping cold so refrigerate until ready to use.


To make the muffin batter:

In a large bowl, combine the flour, baking soda, baking powder, salt and cinnamon. Whisk to combine.

In a medium size bowl, combine the mashed bananas, sugar, vanilla, egg and melted butter. Stir well until combined.


Make a well in the center of your dry ingredients and pour the wet ingredients into the well. Using a wooden spoon, mix just until combined. (there may still be some light streaks of flour remaining). Gently fold in the chopped walnuts. Tip: It's important not to overmix muffins otherwise they will come out tough, not light and tender. The secret to a good muffin is not to overmix.


Using a spoon (or large cookie or ice cream scoop), scoop the batter into the prepared muffin pan dividing evenly between the 12 cups.

Divide the crumble topping mixture evenly between the 12 mufins.

Since these are large muffins with a topping, I like to use muffin/cupcake liners with tall edges like these tulip cupcake liners. The batter clings to the edges creating tall muffins and the topping stays intact. If you don't have these, regular cupcake liners or just spraying the pan with non-stick spray also works, but some of the crumble topping may fall off.

Bake at 375 for 18-20 minutes. Test with a toothpick to ensure muffins are done but don't overbake. Allow to cool in the pan for 10 minutes then remove to a wire rack.


Tip: Place foil or a baking sheet on the rack underneath the muffin pan to catch any sugar that may fall off of the topping so it doesn't make a mess in your oven.

Store leftovers (if any) in an air tight container for up to 2 days. You could probably freeze these muffins too but nothing ever lasts long enough in my house for me to freeze.

Sunday, January 22, 2012

Moms Pineapple and Peach Empanada

Mom’s Pineapple and Peach Empanadas


I know all of you foodies like me have a few special recipes your mom, grandmother or auntie has made that makes you just salivate at the name of it. Well, that is how it is for me with my mom’s empanadas.   Empanada is a Mexican term for an American turnover.   As a kid, it was a special day when my mom made empanadas which can be filled with numerous fillings.  Traditionally in Mexico, they are made with calabaza (pumpkin), but there are a lot of variations.  My favorites are my mom’s Pineapple or Peach Empanadas. The filling is sweet and tart, while the pastry has mild butter taste.    I was luck today to spend the day with Mom and get her recipe to share with you all. I guarantee you will not be able to eat just one. Happy cooking everyone!

Filling

20 oz can of crushed pineapples in juice (not heavy syrup)

15 oz can of peaches pieces (or sliced and cut into ½ inch pieces)

2/3 cup sugar (1/3 cup for pineapple filling and 1/3 cup for the peach filling)

½ cup water (1/4 cup for the pineapple filling and ¼ cup for the peach filling)

4 tablespoons cornstarch (2 tablespoons for pineapple filling and 2 tablespoons for peach filling)


Pastry

4 cups flour

1/3 cup sugar

1 Teaspoon baking soda

¼ teaspoon salt

2 eggs

¾ cup soften butter

½ + 2-4 tablespoons of warm milk

Egg Wash
1 egg white
½ teaspoon water


Filling-

-In two small sauce pans over medium heat, pour the contents of the crushed pineapple into one sauce pan and the contents of the peach pieces into the second pan.
-add 1/3 cup of sugar into each pan. Stir and bring to a boil


-mix ¼ cup of water into 2 tablespoons of cornstarch (do this twice, once for each filling)

-pour cornstarch mixture into filling.  Mix. Continue to cook for an additional 2-3 minutes until its thick.


-remove from heat, cook in ice water for 30 minutes and then remove and put aside.


Pastry-

-mix flour, sugar, baking soda and salt into a medium size bowl with a whisk


-add both eggs to the center of the bowl, using your fingers, mix eggs into the flour.


- add soften butter to the center of the bowl. Using your hands, mix butter into the flour until dough has a crumb texture.


-add ½ cup warm milk to flour and mix until dough starts forming a ball.  Add additional milk if needed.  Dough ball will have an elastic texture.(as picture attached)


-cover bowl with kitchen towel and set aside in warm area for 30 minutes


(Preheat oven to 350 as you wait for the dough)


Making empanadas-

- take dough ball and start cutting off small pieces to make 2 inch balls.  Should make between 18-24 balls


-on a floured surface, using a rolling pin, roll dough balls out to 6 inch circles.


-add 2 -3 tablespoons of filling.


-fold in half, press end together tightly.


-staring at the left end, using left index finger, start folding over end, then continue to the next section forming a scalloped edge.


- Place on cookie tray


-Once you are done making all the empanadas, combine 1 egg white with ½ teaspoon of water. Beat for 2 minutes.   Using a pastry brush, brush each empanada with the egg wash.  This will help the empanadas get a nice golden color on top.


-Bake for 25-30 minutes at 350 degrees until golden brown on top.


- cool for 10 minutes (yes, it will be hard to wait but worth it since you will not burn your mouth! )

Friday, January 20, 2012

Insanely Good Salted Toffee Chocolate Bars


This is a bonus posting this week because I could not wait one single minute longer to share this recipe with you. Last night at Book Club (I know, sounds geeky, but we actually have a lot of fun) the conversation turned to the topic of food, as it usually does. One of the girls raved about a Martha Stewart recipe for a Salted Toffee Chocolate Bar that her husband calls "Crack". We immediately looked up the recipe and wouldn't you know, I had all of the ingredients to make them in my pantry! I love it when that happens. The recipe is so easy and quick, I made some this morning.

"Insanely Good" Salted Toffee Chocolate Bars

Ingredients:
13 graham crackers
1 8oz bag toffee bits (such as Heath)
1 1/2 cups natural almonds, toasted and coarsely chopped
1 c unsalted butter (2 sticks)
1/2 c granulated sugar
1 1/4 c bittersweet chocolate, chopped (the recipe calls for 3/4 c but I like a lot of chocolate)
1/2 tsp coarse kosher salt

Directions:

Preheat oven to 350

Line a rimmed baking sheet (mine was 17"x 13") with nonstick aluminum foil or spray regular foil with non-stick spray.

Place graham crackers in a single layer on the baking sheet.


Sprinkle the toffee bits and almonds evenly over the graham crackers.


In a medium size heavy saucepan, melt butter and sugar over medium-high heat stirring occassionally to combine and bring to a rolling simmer. Reduce heat to medium and continue to cook for 2 minutes swirling the pan occassionally to prevent scorching.


Remove from heat and immediately pour over the prepared graham cracker layer as evenly as possible.


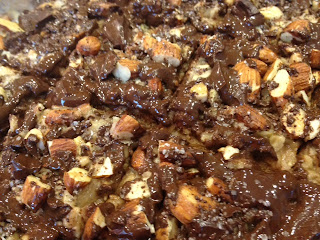
Bake until sugar/butter topping is bubbly (approx 12 minutes). Remove from oven and sprinkle the chocolate chunks evenly over the top. Sprinkle with salt.


Yumm chocolate....


Here's a closer look at the chocolate....


Using a sharp knife or pizza cutter, cut into 2" squares. This needs to be done while still warm. Allow to cool completely, then remove from the baking sheet. Store in an air-tight container for up to 1 week (if they last that long!)

Source: Martha Stewart

Wednesday, January 18, 2012

"Good bye and Good luck" German Chocolate Cupcakes


Today my husband organized a "Farewell" lunch for a coworker who is leaving for Bahrain. Since her favorite dessert is German Chocolate Cake, I offered to make German Chocolate Cupcakes to thank her for her service and sacrifice and wish her well. I thought it would be a great idea to post the recipe on the blog today in her honor. I hope she will have the chance to make these cupcakes herself whenever she's feeling homesick and wants a taste of "home".


Since German Chocolate Cake can be dry and lacking in chocolate flavor, I use my all-time favorite chocolate cake recipe as the base instead of the traditional german chocolate cake recipe. It is dark, moist and full of chocolate flavor, everything a chocolate cake should be. The thing I love most about this chocolate cake recipe is that it actually gets better with age! It is even more moist and the chocolate flavor gets even deeper the next day. It's a great cake recipe to use to make a day ahead and leftovers (if any) taste awesome even several days later! The Coconut Pecan Icing recipe is DIVINE and the best I have ever tried. I could eat spoonfulls of this icing just by itself.


I know most people are not fans of German Chocolate Cake, but this combination won me (a non-german-chocolate-lover) over. I hope you'll try it for the German Chocolate Lovers (and maybe even convert the non-german-chocolate lovers) in your life!


Coconut Pecan Frosting
Makes enough frosting for 24 cupcakes or an 8" layer cake


1 12oz can evaportated milk
1 1/2 sticks unsalted butter at room temperature, cut into small pieces
1 1/4 c light brown sugar, packed
3 egg yolks
1  tsp vanilla
1/4 tsp salt
2 2/3 c sweetened flaked coconut
2 c pecans, toasted and coarsely chopped into large pieces (it is important to toast the pecans to bring out the nutty flavor)


In a medium size saucepan, combine the evaporated milk, egg yolks and brown sugar. Add the butter and cook over medium heat stirring constantly until thickened.


This process takes from 8-10 minutes. Remove from heat and pour though a mesh strainer into a bowl.


Add the vanilla extract, salt, coconut and pecans and stir thoroughly to combine.


Cool completely to allow the frosting to finish thickening. It should become a thick spreading consistency. I usually cool mine to room temperature then put in the fridge for a few hours to finish thickening. You can also make it a day ahead.


 Source: Adapted from Martha Stewart


Chocolate Cupcakes
Makes 24 cupcakes or two 8" layers or one 13"x9" cake


2 cups granulated sugar
1 3/4 c all purpose flour
3/4 c unsweetened natural cocoa powder
1 tsp salt
1 1/2 tsp baking soda
1 1/2 tsp baking powder
1 c milk (I used 2% but whole or buttermilk would work too)
1/2 c canola oil
2 large eggs at room temperature
2 tsp vanilla extract
1 c boiling water (I've also made this recipe by substituting 1 c hot coffee or adding 1 T instant espresso powder to the boiling water)


In a large bowl, whisk together all dry ingredients. Add the eggs. milk, oil and vanilla extract. Using an electric hand mixer, beat on medium speed for 2 minutes. Stir in the 1 cup of boiling water until incorporated. At this point your batter will look very thin and runny and you might start to panic, but don't worry, you didn't make a mistake! That's just how the batter looks...


Pour into the prepared cupcake pans (or cake pans if using). Bake at 350 until done and a toothpick inserted in center comes out clean. Cupcakes usually take about 25 minutes and cake usually takes about 30-35 minutes but all ovens are different so be sure to start checking for doneness around 20-25 minutes into the baking process.


When done, remove from oven and allow to cool in the pan for 10 minutes, then remove to wire cooking rack to cool completely.


Frost your cupcakes (or cake) with the Coconut Pecan Frosting and decorate as desired. Since I made cupcakes, I just frosted the tops then drizzled with a little chocolate ganache.


When I make this recipe into a cake, I usually make a chocolate frosting and use the Coconut Pecan Frosting in the middle of the layers and on top.