Monday, April 18, 2016

Candied Flower Shortbread Cookies for #creativecookieexchange


So if you saw my recent Instagram post, you might be guessing who the special person is who inspired these cookies. Well, that person would be my mom!


I don't talk about my mom very often on the blog. I mainly focus on sharing recipes without getting too personal, because after all, you are here for the food. Well, the theme for this month's Creative Cookie Exchange was Mother's Day so I thought now would be the perfect time to say a little bit about the woman who has been a major influence in my life.

 
My mom was born and raised in the Philippines and had far from a privileged childhood. As a result, she's not a very mushy, sentimental type of person. My mom taught me the value of hard work, to earn what I have and not expect it to be handed over on a silver platter. She taught me to be tough and strong, to put my family before myself and to give without expectation. I am the person I am today because of my mother.

 
My mom has the biggest green thumb of anyone I know. She can grow anything, anywhere. Here she is with her giant collard greens! The leaves are almost as big as she is!!
This woman could literally make roses grow out of a rock (ok maybe not literally, but you get the picture). I don't know how she does it. Growing up, she had these beautiful rose bushes which she would care for and water every day. The smell of roses in our front yard was intoxicating. I, unfortunately, did not inherit her green thumb, but I can bake, and I baked these cookies for her.

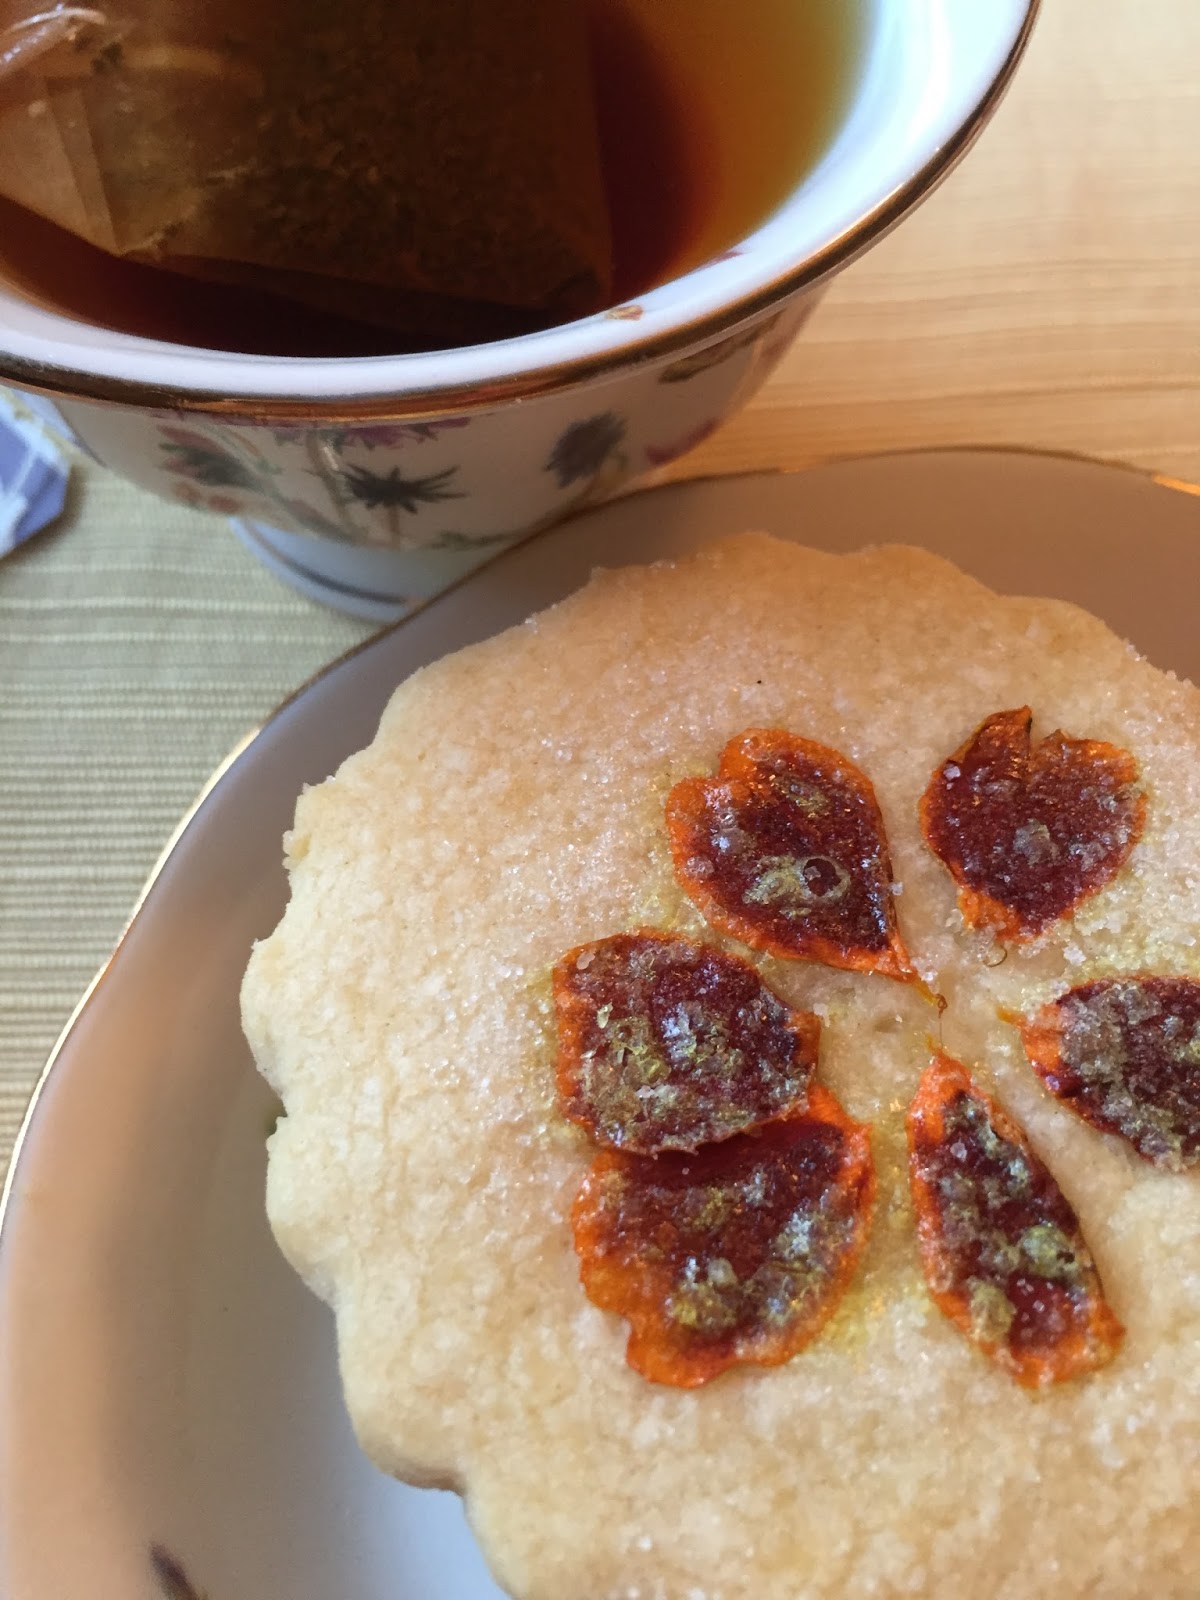
These Candied Flower Shortbread Cookies are the perfect tribute to my mom. Made with pretty, edible flowers, they are beautiful, strong and not too sweet, just like my mom...

These cookies are also far from perfect, just like me...

I know your mom would enjoy them too! Why not make some for Mother's Day?

Candied Flower Shortbread Cookies
Makes approx. 18 cookies (depending on the size)
Adapted from Curtis Stone

Ingredients:
1/2 cup (1 stick) unsalted butter, softened
1/3 cup granulated sugar + more for sprinkling
1 cup + 6 tablespoons all purpose flour
pinch of salt
Egg wash - l large egg white, beaten which 1 tablespoon water
18 edible flowers (small pansies preferred)

Directions:

Prepare the flowers

Gently wash the flowers in cold water and place face down on a paper towel to dry for about 15 minutes. After 15 minutes, turn the flowers face up and allow to dry completely.

Make the dough

Combine the flour and salt in a small bowl and whisk to combine. Set aside.

In the bowl of your stand mixer fitted with the paddle attachment (or using your hand mixer), cream the butter and granulated sugar together until light and fluffy (approx. 2 minutes).

Add the flour mixture and mix at low speed just until combined.

Place the dough on a piece of plastic wrap, form into a disc, wrap tightly and refrigerate for 1 hour or overnight.

Bake the cookies

When ready to make the cookies, remove the dough from the refrigerator and allow to stand at room temperature for about 5 minutes so that it is pliable enough to roll out.

Preheat oven to 350f

Roll the dough to 1/4" thickness between 2 sheets of parchment paper. Cut into circles using a 1 3/4" to 2" cookie cutter (depending upon the size of your flowers). You can do a mixture of both sizes if needed. The size of your flowers will dictate the size you need to cut the cookies into.

Place the cookies on parchment lined baking sheets and refrigerate for 10 minutes.

After 10 minutes, remove from fridge and bake for about 10-12 minutes or until just lightly golden brown. Remove from oven and place the cookies on a wire cooling rack to cool completely.

Apply the flowers

Reduce oven temp to 325F

After cookies have completely cooled, brush them lightly with egg wash. Carefully place the a flower on the top of each cookie and lightly brush the flower with the egg wash so that it adheres to the cookie.


Sprinkle each cooking lightly with granulated sugar.


Place the cookies back on the baking sheet and bake for another 5 minutes or until the flower has dried out.

Remove from the oven and place the cookies on the cooling rack.


Store cookies in a covered container at room temperature for up to 3 days.

Note: My edible flowers were pretty large and thick so I had to use just some of the petals to construct a flower. Small, flat flowers are preferred for this recipe so you can keep the entire flower intact

Mother’s Day is coming! And what better cookies to make than those either in honor of or for our mothers? You can also use us as a great resource for cookie recipes. Be sure to check out our Pinterest Board and our monthly posts (you can find all of them here at The Spiced Life). You will be able to find them the first Tuesday after the 15th of each month! Also, if you are looking for inspiration to get in the kitchen and start baking, check out what all of the hosting bloggers have made:

Thursday, April 7, 2016

Dark Chocolate, Sea Salt Caramel Peanut Butter Cookies for #theleftoversclub

If you like dark chocolate, ooey gooey caramel, peanut butter and a sprinkling of sea salt (and honestly who doesn't?) then you will love these cookies!


The theme for this month's Leftovers Club exchange was salt. My intentions were to come up with a unique recipe using salt, but time got the best of me, as it often does, and I defaulted to everyone's favorite salted ingredient...salted caramel. I guess you can never go wrong with salted caramel right?

Well, I took this step even farther. Instead of making my own salted caramel (which I highly recommend), I cheated and used Rolo candies cut in half with a sprinkling of sea salt. Voila! Instant "cheaters" salted caramel!
 
For this recipe, I used my Whoopie Pie pan which I received as a gift a few years ago! I really like baking cookies in this pan. They turn out large and thick without spreading out too much and each one is the same size!


This month I was paired with Alli from Tornadough Alli! Don't you just love her blog name? Alli is one of 3 new members to The Leftovers Club and I for one know we're really excited to have her in our group!
 
 Alli sent me these delicious Sweet & Salty Ruffle Treats. They were so good!! Thanks Alli!


With this being Alli's first swap with the group, I knew I had to make a good impression. Not only did I send my package out to her early (normally I'm very last minute), but I also included these artisan salts handmade in Vista, CA where I live! I know Alli will come up with a creative use for them!


If you're interested in swapping delicious treats each month with a fun group of fellow bloggers, sign up to join over at Alwayz Bakin! You'll really enjoy it!!
 
Now onto the recipe...


Dark Chocolate, Seat Salt Caramel Peanut Butter Cookies
Makes 16 large cookies
 
Ingredients:
1 1/4 cup all purpose flour
1/4 teaspoon baking soda
1/2 teaspoon salt
1/2 cup unsalted butter, softened
1/3 cup granulated sugar
1/3 cup brown sugar (I used golden)
1 large egg, room temperature
1 tablespoon vanilla extract
1 cup crunchy peanut butter
1/2 cup extra dark chocolate chips (I used Guittard)
20 rolo candies cut in half or thirds
Sea Salt & Extra dark chocolate chips for sprinkling on top
 
Directions:
 
Preheat oven to 350f


Place the flour, baking soda and salt in a small bowl and whisk to combine. Set aside.

In the bowl of your stand mixer fitted with the paddle attachment (or using a hand mixer), cream the butter and sugars together at medium speed until light and fluffy (approx. 3 minutes) scraping down the bowl with a rubber spatula as needed.

Add the egg, vanilla and peanut butter and mix at med-low speed until combined. Scrape down the bowl with a rubber spatula.

Add the dry ingredients and mix on low speed until combined. Fold in the dark chocolate chips.

Scoop about a tablespoon and a half of dough into each cup of your whoopee pie pan then smooth the dough out to the edges. The cup should be about 3/4 full but not all the way to the top.

Place a few cut up pieces of Rolos on top of each cookie. I like to alternate them with the cut side face up and face down. Then sprinkle a few dark chocolate chips on top. Sprinkle a little sea salt on top of each cookie making sure you put some on top of the caramel.

Bake at 350f for approx. 10 minutes. The edges should look set but the middles may still be soft. Do not over bake.

Remove the pan from the oven and place on a wire cooling rack to cool. Allow cookies to cool and set in pan for about 15 minutes then carefully remove by running a knife carefully around the edges and then lifting them out of the pan. Place on a wire cooling rack after removing.

Enjoy!

Store leftovers tightly covered at room temp for up to 2 days.


Monday, April 4, 2016

Peppermint Brownies and Dairy Free Lemon Coconut Bars using Young Living Essential Oils

Before this post, if you had asked me whether or not I would ever consider baking with Young Living Essential Oils, my answer would have been a flat out "no". Well, as that old saying goes, "never say never"....
 
My friend Rachel recently asked me to make Peppermint Brownies and Lemon Bars using  Young Living Essential Oils for an upcoming event she was hosting. Truth be told, I was a little hesitant, and honestly I was prepared to hate the outcome. I thought the oils would give my baked goods that fake, artificial flavor that I hate. Boy, was I wrong!
 
I am not a fan of mint and chocolate together, but I absolutely loved how the Peppermint Brownies turned out. I did a trial run before the event and my husband and I couldn't stop eating them! They were that good! Don't get me wrong, I'm not about to run out and buy a box of Andes Mints or York Peppermint Patties, but I will be baking these brownies again that's for sure.
 
I also fell in love with these Dairy Free Lemon Coconut Bars using Young Living Lemon Essential Oil. Sometimes lemon desserts just don't capture that burst of fresh lemon flavor, however adding the Young Living Lemon Essential Oil, really boosted the lemon flavor without imparting any artificial taste like you would get with a flavored extract.


I can now honestly say that I'm looking forward to baking and experimenting using the entire line of Young Living Essential Oils. Peppermint and Lemon are just a few of the amazing options available. I'm excited to try out the tangerine essential oil next!
 
If you're interested in finding out more about Young Living 100% therapeutic grade oils, trying out these recipes (or adding essential oils to any of your own recipes), feel free to contact Rachel Lincoln directly. Just as she did with me, she will guide you in the right direction on your Young Living journey!


Young Living Peppermint Brownies
Makes 24 brownies (one 13"x9" pan)
 
Ingredients:
1 1/4 cups all purpose flour
1 tsp salt
2 tablespoons Hershey's dark cocoa powder
11 ounces dark chocolate chopped (I use about half of a Trader Joe's Dark Chocolate Bar)
1 cup unsalted butter, softened
1/2 tsp espresso powder (optional)
1 1/2 cups granulated sugar
1/2 cup light brown sugar, packed
5 large eggs, room temperature
1 tsp vanilla extract
1 cup chocolate chips or chunks
6-8 drops Young Living Peppermint Essential Oil
 
Follow the directions for "The Most Amazing Brownies" here, but after whisking in the vanilla extract, add 6 drops of Young Living Peppermint Essential Oil and whisk to combine. Taste the batter. If you like the strength of the peppermint flavor, proceed to the next step (folding in the flour mixture). If you would like a stronger peppermint flavor, add 2 more drops of essential oil and whisk to combine, then fold in the flour mixture. Continue as directed.
 
Enjoy!!
 
Store leftovers tightly covered at room temperature for up to 3 days.


Young Living Dairy Free Lemon Coconut Bars
Makes 24 bars (one 13"x9" pan)
 
Crust Ingredients:
1/2 cup sweetened shredded coconut toasted (plus another 1/2 cup for sprinkling on top of the bars)
2 cups all purpose flour
1/3 cup powdered sugar
1/3 cup light brown sugar, packed
1/8 tsp salt
3/4 cup coconut oil, solid
 
Filling Ingredients:
4 large eggs
1 cup + 2 tablespoons granulated sugar
Zest from 2 large lemons
2/3 cup fresh lemon juice
3 drops Young Living Lemon Essential Oil
1/4 cup all purpose flour
1/8 tsp salt
 
Directions:
 
Line a 13"x9" pan with nonstick aluminum foil or spray regular aluminum foil with nonstick cooking spray.
 
Preheat oven to 350f
 
Add the 1/2 cup of toasted coconut to the bowl of your food processor and pulse until finely ground.
 
Place the ground coconut in a bowl and add the flour, both sugars and salt. Whisk to combine.
 
Add the solid coconut oil and cut the oil into the flour mixture with a pastry cutter until mixture looks like coarse meal. 
 
Press the mixture evenly into the bottom of the prepared baking pan and bake for about 15 minutes or just until crust is lightly browned.
 
While the crust is baking, making the filling -
 
In a medium bowl, lightly whisk the eggs, then add the lemon zest, lemon juice, lemon essential oil, sugar, flour and salt and whisk well to combine.
 
Reduce oven temp to 325F
 
When the crust is ready, pour the filling over the hot crust and bake at 325f until firm (approx. 15 minutes).
 
Remove from oven and place on a wire cooling rack to cool to room temp. Cover and place in the refrigerator for 2-3 hours.
 
Use the foil to lift the bars out of the pan and cut into squares. Sprinkle with the remaining 1/2 cup of toasted coconut.
 
Enjoy!
 
Store leftovers tightly covered in the refrigerator for up to 2 days.