Thursday, January 31, 2013

Super Bowl Round Up

 
I believe I know where most of America will be this Sunday - watching the 49ers and Ravens battle it out in Super Bowl XLVII. We're big Chargers fans in our house (of course) but since the Chargers had another disappointing season, we'll be keeping it local and rooting for the 9ers.
 
Now we all know, the Super Bowl is just as much about the commercials, half-time show and the food as it is about the game itself. So whether you're hosting a Super Bowl party or bringing a dish to a party you're attending, we have a few winning recipes you should try.
 
On the top of the list of Super Bowl must-haves is wings. People just expect wings at Super Bowl parties, especially Buffalo Wings. Try this twist on the traditional Buffalo Wing - Baked Sriracha Chicken Wings. These wings are still spicy but not overpowering. Plus, they're baked, not fried! Meaning you can watch the big game instead of standing over the stove frying wings. Score!!
 
 
Meatballs are always a great appetizer to serve at a party and we have two great recipes, one healthy and one not so healthy. These Parmesan Turkey Meatballs are a leaner option and easy to make.


However, if Bacon is your thing (and let's face it, who doesn't love bacon?), then try these Meat Lovers Smoky Bacon Meatballs. They're a little more labor intensive, but the smoky bacon flavor is worth it.


Looking for some amazing dip recipes, how about this super easy Roasted Jalapeno Hummus (doesn't require Tahini!) or this Baked Cauliflower Dip? After all, you do need to eat your veggies!


And for a little something sweet, we got you covered. You can never go wrong with cheesecake & cookies, but how about cheesecake and cookies together? These Mini Chocolate Chip Cookie Cheesecakes have a chocolate chip cookie base, making them a two-in-one dessert. Plus they're mini so your guests can just grab and go. They're a great make ahead option and can be made a day or two before your party.
 
 
So whether your team wins or loses, you will definitely be a winner with any of these delicious recipes.
 
Go 9ers!!
 

Thursday, January 24, 2013

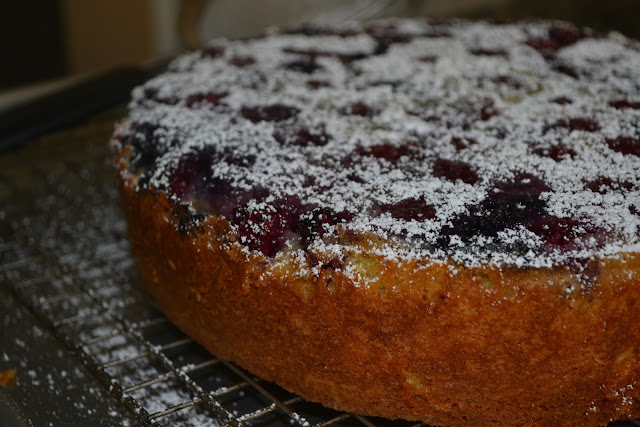
Black & Blueberry Buttermilk Cake


The weather in San Diego this past weekend was unusually warm which had me thinking of Summer fruit. It just so happens that Blackberries were on sale at Sprouts for only .99 cents a package so I had to indulge.
 
On their own, the blackberries were sweet and delicious; definitely some of the sweetest blackberries I have ever tasted, but I bought so many of them I wanted to incorporate them into a coffee cake/dessert. I also had some buttermilk in the fridge that was about to expire so I decided to make this Blackberry Buttermilk Cake which I am calling Black & Blueberry Buttermilk Cake because I ended up throwing in some Blueberries.
 
The cake is tender, moist and delicious. The addition of fresh lemon and orange zest compliments the fresh berries perfectly and made them taste even better! If you make this cake, which I sure hope you will, definitely do not skip out on the fresh citrus zest.
 
My husband brought some of the cake to work with him 3 days after I baked it and it was still moist, fresh and delicious. I don't recommend going beyond 3 days since fresh berries can spoil pretty quickly.

Black & Blueberry Buttermilk Cake


Ingredients:
3/4 cup unsalted butter at room temperature
2 1/3 cups sifted cake flour (sift the cake flour first, then measure out 2 1/3 cups)
6 ounces fresh blackberries and 3 ounces fresh blueberries
1/4 cup granulated sugar for the topping
1 1/3 cups granulated sugar for the cake batter
1 1/2 teaspoons baking powder
3/4 teaspoon salt
1/2 teaspoon baking soda
3 large eggs, room temperature
2 teaspoons vanilla extract
1/2 teaspoon fresh lemon zest
1/2 teaspoon fresh orange zest
1 cup well shaken buttermilk
Powdered sugar for dusting

Directions:

Position oven rack in the center of the oven and preheat to 350 degress F.

Butter a 9-10" springform pan. Place a circle of parchment paper at the bottom. Butter the parchment paper and lightly dust the entire inside of the pan with flour.**Alternatively you can use a 9"-10" cake pan, but please make sure you butter and flour the pan & use the parchment paper. This helps prevent the berries from sticking to the bottom of the pan.

Into a medium size bowl, sift together the flour, baking powder, baking soda and salt. Set aside.** Essentially you are sifting the flour twice - before you measure it and again in this step. Don't skip this step, it gives the cake its' light fluffy texture.


Sprinkle the berries in an even layer into the bottom of the prepared pan, then sprinkle 1/4 cup of sugar over the berries.


When this photo was taken, I realized I didn't have enough Blackberries so I filled in the gaps with blueberries. Hence the name Black & Blueberry Buttermilk Cake.

In the bowl of your electric stand mixer fitted with the paddle attachment (or in a large bowl using your electric hand mixer), cream together the butter and the 1 & 1/3 cups granulated sugar until light and fluffy (approximately 2 minutes).


Add the eggs, one at a time, mixing well after each addition and scraping down the bowl as needed.


Beat in the lemon and orange zests and the vanilla at low speed and mix just until combined.

At low speed, mix in the flour mixture and buttermilk alternating between the two. Start with 1/3 of the flour, mix just until combined, add 1/2 of the buttermilk, mix until just combined and repeat. Be sure to mix just until combined during this step so you don't overmix the batter.


Spread the batter in an even layer into the prepared pan.


Place on a baking sheet and bake for approxinmately 45-50 minutes. Since each oven is different, be sure to check for doneness at the beginning of the bake time (around 40 minutes). If the cake isn't done, repeat checking for doneness periodically until done. If your cake starts to brown too quickly, tent it with a piece of foil. The cake is done when it springs back when lightly pressed in the center or a toothpick in the center comes out clear. Be careful not to overbake.

Remove from oven and cool in pan on cooling rack for 15 minutes. Remove the sides from the springform pan and invert only a cooling rack. Carefully remove the parchment paper being careful not to pull off the berries.


Allow to cool a few minutes longer then dust generously with powdered sugar.


Place on a cake stand or platter and serve (dusting again with powdered sugar if needed).


Store leftovers tighly covered at room temperature. Since this cake is made with fresh berries, I recommend eating within 2 days although my husband brought our leftovers with him to work on day 3 and the cake was still moist and delicious. I wouldn't go any longer than that....

Wednesday, January 23, 2013

Apple Crumble Tart for Nick's 19th Birthday


Finally, our Blog is back up and running!! I've been wanting to post this recipe for about 2 weeks now, but there was an issue with Google that is finally fixed! Yay! I was starting to have Blogger withdrawals.
 
My inspiration for making this tart with my son Nick's 19th birthday. We had to celebrate his birthday early this year while he was in town visiting for the holidays. He spent his actual birthday in Napa at Culinary School. I know, rough life huh? This was actually the first birthday we have ever spent apart. I was a bit sad about that, but I know he's growing up and pursuing his dream so that made it better (a little).
 
While Nick was in town, I made this Apple Crumble Tart in honor of his birthday. I had been wanting to use the rectangular tart pan I bought a few months ago so this was the perfect occassion!


Apple Crumble Tart

Crumble Topping Ingredients:
1/2 cup all purpose flour
1/2 cup old fashioned oats
1/2 cup packed light brown sugar
1 teaspoon cinnamon
1/8 teaspoon nutmeg
1/4 teaspoon salt
6 tablespoons of unsalted butter, cold cut into cubes


Tart Ingredients:
1 refrigerated pie crust (or use homemade if you prefer)
4 large apples (I used 2 Granny Smith + 2 Golden Delicious)
1 tablespoon of fresh lemon juice
1 teaspoon of fresh lemon zest (zest the lemon before you juice it)
1/4 cup packed light brown sugar
1/4 cup granulated sugar
3 tablespoons all purpose flour
1/2 teaspoon cinnamon
1/8 teaspoon nutmeg
1/4 teaspoon salt
1/2 teaspoon vanilla
3 tablespoons unsalted butter

Directions:

Make the topping

In a medium size bowl, combine the dry ingredients and spices. Cut in the cubed cold butter with a pastry cutter (you an also use 2 forks or butter knives) until you get a course crumble mixture. Set aside.


Make the apple filling

Peel and core the apples. Slice into 1/4" thick slices. Place the apples in a bowl and toss with the lemon juice and zest.

In a small bowl, combine the sugar, spices and flour.

Melt the 3 tablespoons of butter in a skillet. Add the apples then top with the sugar/flour/spice mixture.


Cook over medium-low heat until the apples are slightly tender. Stir in the vanilla extract.


Remove from heat and allow to cool for 10 minutes.


Assemble the Tart

Here's a photo of the rectangular tart pan with removable bottom that I bought online at Amazon. Tip: As with any baking pans, try to buy one with a light color finish. Your baked goods will bake more evenly. Dark color pans tend to brown too quickly.


Place the rectangular pan on a baking sheet.

Preheat oven to 375.


Roll the pie crust out in the shape of a rectangle to fit your pan and fold down the sides to create a double layer to reinforce the edges. I wasn't able to roll out the pie crust large enough otherwise it would have been too thin so I had to cut a few pieces of the dough to create the reinforced edges.


Place the slightly cooled apple filling into the pan in an even layer.


Sprinkle the crumble topping evenly over the apples.


Bake at 375 degrees f for approx 30 minutes or until the crust is golden brown and the apples are bubbling.


Allow to cool until sturdy enough to handle and carefully remove from the tart pan. You might need to loosen the endges with a thin, sharp knife.

Place on a cutting board.


Slice and serve with a scoop of vanilla bean ice cream.


Store any leftovers loosely covered at room temperature for 2 days or refrigerate and reheat each serving as needed.

Enjoy!!

Friday, January 11, 2013

Anytime Vanilla Bean Simple Cake with Boiling Coconut Topping

Perfect Dessert to Dry up the tears of the RedSkin losing last week; Anytime Vanilla Bean Simple Cake with Broiled Coconut Topping (adaption of a Better Home and Gardens Recipe)


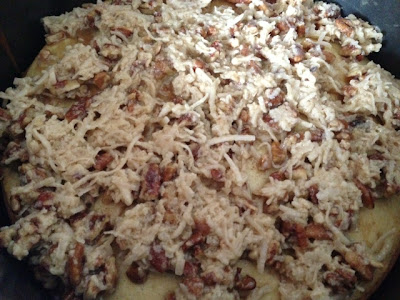
Welll… what can I say, Cake fixes everything!  After last week Redskins loss, my boyfriend's team, we needed some good old fashion bandaid dessert.   This easy cake  was the perfect cure. It is delicious!  Believe it or not, it was finished before the caramel brownies (recipe to follow soon).   The cake it light and flavorful and then coconut and pecan topping was amazing. Did I say how easy this cake was to make!  Yes, you can make it. I promise!! I hope you give this 
Anytime Vanilla Bean Simple Cake with Broiled Coconut Topping
 a try.  I will actually make this cake again this week, Faye… maybe I will drive one over to you!

And Redskins, we will be cheering you on next season!  Maybe this time the cake will be called a Victory cake.
Happy Cooking Everyone!

Ingredients
1 ½  cups all-purpose Flour
2/3 cup sugar
2 teaspoons baking powder
2/3 cups whole milk
¼ cup sweet cream butter (soften)
1 egg
½ a vanilla bean (scrapped)
2 teaspoons vanilla

Topping
¼ cup light brown sugar
2 tablespoons sweet cream soften butter
2 tablespoon whole Milk
½ cup flaked coconut , packed
1/3 cup chopped pecans
--------------------
Cake:
1. Pre-Heat oven to 350 degrees
2. Spray an 8 inch round cake pan with non-stick spray
3. Combine, flour, sugar, baking powder together in a large bowl . Set aside.


4. In a medium size bowl, combine  milk ,  egg, vanilla bean and vanilla.


5. Pour the vanilla mixture into the flour mixture. Mix until combined.


6. Add softened butter and mix till its blended, do not over beat.

7. Poor cake mixture into prepared pan. Bake for 25 minutes.(do the toothpick test. Insert toothpick into cake and when it  come out clean.its done)


Topping
8. While cake is baking, make the topping.
9. Beat the butter with the brown sugar .
10. Add the milk and mix till smooth
11. Add the coconut and nuts.
12. Set aside till cake done.


Finishing Cake
13. Once cake it done, remove from oven and set the oven to Broil.  Move your Rack  so its about 4 inchs from Top.
14. Spread the Topping over the whole top of the cake. And put back into the oven


15. Broil for 3-4 minutes. Till top is bubbling.


16. Cool on wire rack.
17. Enjoy!


Thursday, January 3, 2013

My Family's Favorite Pulled Pork


My son, Nick, was visiting from Culinary School for the holidays. Having a child in Culinary School can be a bit intimidating. Nick raves about the amazing food he enjoys on a daily basis. One of the benefits of attending Culinary School is the wide array of gourmet food you have available to you for breakfast, lunch and dinner. Unlimited food, unlimited desserts... sounds like heaven to me. So cooking for Nick while he was home was challenging. I knew his palate had changed and become more sophisticated, but would he still have the same appreciation for good old-fashioned, home cooking made with love? As it turns out, he did.
 
One of our traditions for New Years, is eating Soul Food (paying homage to my Dad's side of the family from the South) and of course, the must-have dish is black eyed peas to bring good luck for the new year. This year, I made Pulled Pork to go with the black eyed peas and rice. It's slow roasted, succulent and delicious. The basic recipe is one I use to make a variety of dishes; BBQ Pulled Pork Sandwiches, Carnitas, Pulled Pork Grilled Cheese with Carmelized Onions, Baked Sweet Potatoes stuffed with BBQ Pulled Pork (my personal favorite) or just plain with your favorite side dishes. No matter how you serve it, this recipe is a winner.
 
It all starts out with the Pork Butt (aka Pork Shoulder). Pick one with a good fat cap (the layer of fat covering the top). This fat will baste the roast as it cooks and keep it juicy and succulent.

Marinating overnight with a good rub is a must and low and slow cooking is the way to go. This recipe takes
6-7 hours in the oven, so plan ahead.


My Family's Favorite Pulled Pork
 
Ingredients

One Pork Butt (aka Pork Shoulder) average 6-7 lbs
 
 
Rub Ingredients
3 tablespoons paprika
3 tablespoons coarse kosher salt
1 tablespoons ground mustard
1 tablespoons brown sugar
1 tablespoon garlic powder
 
Combine all ingredients in a bowl and set aside.
 
This makes enough rub for a 6-7 lb Pork Butt. If your roast is larger, increase amount by using a proper ratio of each of the ingredients.


Directions:
 
Rub dry rub all over the surface of the Pork Butt. Use all of the rub. You want to liberally coat the meat.


Place the Pork Butt in a pan, cover with plastic wrap and place in the refrigerator overnight.
 
Remove Pork Butt from the refrigerator approximately 2 hours before roasting to bring to room temperature. This is essential for even cooking.
 
Preheat the oven to 300 degrees.
 
Place Pork Butt on a roasting rack in a roasting pan and roast uncovered for 6 hours. My roast was slightly larger than 7 lbs so I cooked mine for 7 hours.


Remove Pork Butt from oven and allow to rest for 30 minutes. Shred using 2 forks, removing any large chunks of fat.


If making BBQ Pulled Pork, add your favorite BBQ sauce (my family's favorite is Sweet Baby Ray's) and toss to coat. Serve on Hamburger Rolls (or Dinner Rolls to make sliders) topped with your favorite toppings (cole slaw or cripsy onions are great).


If making Carnitas, I fry some of the shredded pork in a hot frying pan with a little oil to crisp up some of the pork.
 
Or try my personal favorite - BBQ Pulled Pork Stuffed Sweet Potoatoes.