Showing posts with label caramel. Show all posts

Thursday, April 7, 2016

Dark Chocolate, Sea Salt Caramel Peanut Butter Cookies for #theleftoversclub

If you like dark chocolate, ooey gooey caramel, peanut butter and a sprinkling of sea salt (and honestly who doesn't?) then you will love these cookies!


The theme for this month's Leftovers Club exchange was salt. My intentions were to come up with a unique recipe using salt, but time got the best of me, as it often does, and I defaulted to everyone's favorite salted ingredient...salted caramel. I guess you can never go wrong with salted caramel right?

Well, I took this step even farther. Instead of making my own salted caramel (which I highly recommend), I cheated and used Rolo candies cut in half with a sprinkling of sea salt. Voila! Instant "cheaters" salted caramel!
 
For this recipe, I used my Whoopie Pie pan which I received as a gift a few years ago! I really like baking cookies in this pan. They turn out large and thick without spreading out too much and each one is the same size!


This month I was paired with Alli from Tornadough Alli! Don't you just love her blog name? Alli is one of 3 new members to The Leftovers Club and I for one know we're really excited to have her in our group!
 
 Alli sent me these delicious Sweet & Salty Ruffle Treats. They were so good!! Thanks Alli!


With this being Alli's first swap with the group, I knew I had to make a good impression. Not only did I send my package out to her early (normally I'm very last minute), but I also included these artisan salts handmade in Vista, CA where I live! I know Alli will come up with a creative use for them!


If you're interested in swapping delicious treats each month with a fun group of fellow bloggers, sign up to join over at Alwayz Bakin! You'll really enjoy it!!
 
Now onto the recipe...


Dark Chocolate, Seat Salt Caramel Peanut Butter Cookies
Makes 16 large cookies
 
Ingredients:
1 1/4 cup all purpose flour
1/4 teaspoon baking soda
1/2 teaspoon salt
1/2 cup unsalted butter, softened
1/3 cup granulated sugar
1/3 cup brown sugar (I used golden)
1 large egg, room temperature
1 tablespoon vanilla extract
1 cup crunchy peanut butter
1/2 cup extra dark chocolate chips (I used Guittard)
20 rolo candies cut in half or thirds
Sea Salt & Extra dark chocolate chips for sprinkling on top
 
Directions:
 
Preheat oven to 350f


Place the flour, baking soda and salt in a small bowl and whisk to combine. Set aside.

In the bowl of your stand mixer fitted with the paddle attachment (or using a hand mixer), cream the butter and sugars together at medium speed until light and fluffy (approx. 3 minutes) scraping down the bowl with a rubber spatula as needed.

Add the egg, vanilla and peanut butter and mix at med-low speed until combined. Scrape down the bowl with a rubber spatula.

Add the dry ingredients and mix on low speed until combined. Fold in the dark chocolate chips.

Scoop about a tablespoon and a half of dough into each cup of your whoopee pie pan then smooth the dough out to the edges. The cup should be about 3/4 full but not all the way to the top.

Place a few cut up pieces of Rolos on top of each cookie. I like to alternate them with the cut side face up and face down. Then sprinkle a few dark chocolate chips on top. Sprinkle a little sea salt on top of each cookie making sure you put some on top of the caramel.

Bake at 350f for approx. 10 minutes. The edges should look set but the middles may still be soft. Do not over bake.

Remove the pan from the oven and place on a wire cooling rack to cool. Allow cookies to cool and set in pan for about 15 minutes then carefully remove by running a knife carefully around the edges and then lifting them out of the pan. Place on a wire cooling rack after removing.

Enjoy!

Store leftovers tightly covered at room temp for up to 2 days.


Wednesday, April 2, 2014

Chubby Hubby Bars

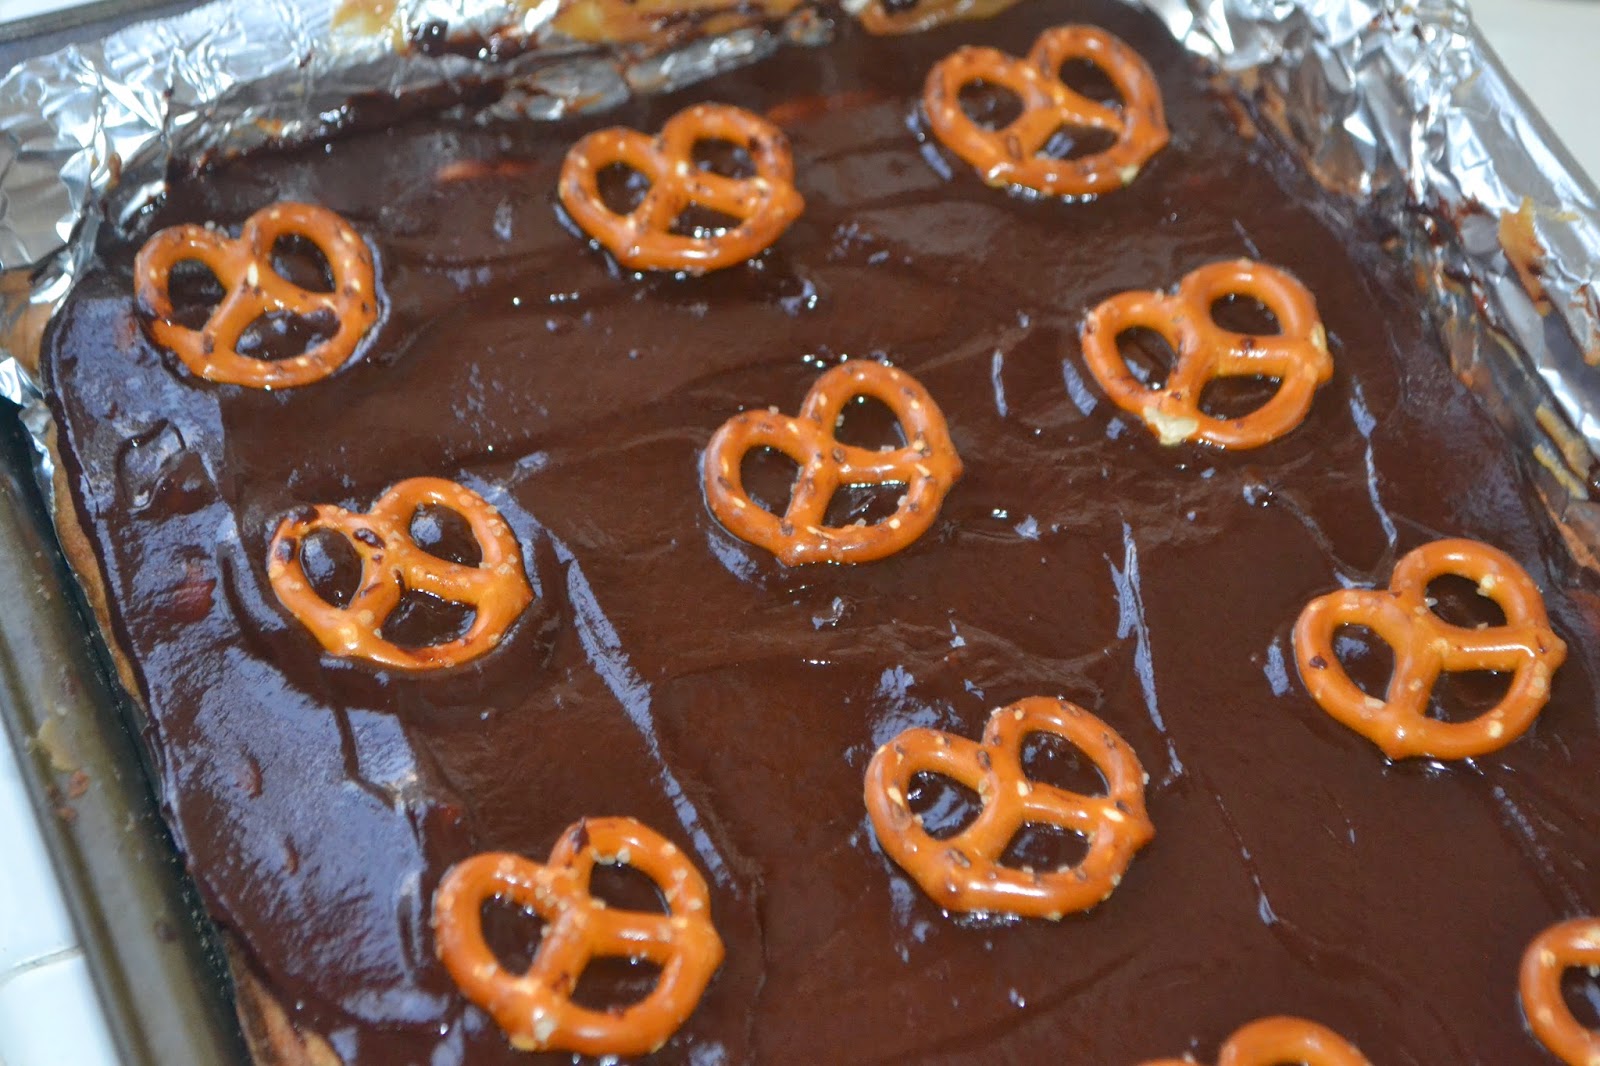
Aside from the catchy name, these bars are insanely delicious. If you love the combination of sweet & salty, this recipe is for you. Imagine a basic blondie with chocolate chips and chopped pretzels, topped with a homemade peanut butter caramel slathered with a rich dark chocolate ganache then garnished with mini pretzels. If that isn't cookie bar heaven, then I don't know what is!


I made these bars for Elizabeth from Food Ramblings for this month's Leftovers Club exchange. Although they require a little extra work than the standard cookie bar, I wanted to make something extra special for Elizabeth for all of the hard work she puts into hosting the Leftovers Club every month. I hope she enjoyed eating them half as much as I enjoyed making them! 
 
If you're interested in joining the Leftovers Club, I encourage you to sign up at Food Ramblings. It's so much fun to send & receive yummy baked goods in the mail every month!


Chubby Hubby Bars
Makes 24 bars
Serves 24 (or one chubby hubby)

** Make Peanut Butter Caramel a day ahead to save time
** This recipe requires chilling to allow each layer to set so plan ahead

Ingredients:

Peanut Butter Caramel
1/4 cup granulated sugar
1/4 cup water
1/2 cup heavy cream
1/2 cup peanut butter
1/8 tsp vanilla extract
1 tablespoon corn syrup
pinch of salt

Bar Ingredients:
2 1/2 cups all purpose flour
1/4 cup malted milk powder
1 teaspoon baking powder
1/2 teaspoon salt
2 sticks unsalted butter, softened
1/2 cup granulated sugar
1 1/2 cups light brown or golden brown sugar
2 large eggs, room temperature
2 teaspoons vanilla extract
1 1/2 cups Chocolate Chips (I used Ghiradelli Bittersweet  Chips)
1 1/2 cups min pretzels coarsely chopped

Ganache Ingredients:
1/4 cup heavy cream
1/2 cup chocolate chips (I used Ghiradelli Bittersweet Chips)

Make the Peanut Butter Caramel:

Place the granulated sugar and water in a medium size heavy bottom saucepan. Bring to a boil over medium heat without stirring. Continue to boil over medium heat until the mixture turns a light amber color. Be sure to watch carefully to prevent burning. Carefully whisk in the heavy cream and cook for another 30 seconds to one minute or until the mixture turns the color of peanut butter.

Remove from heat and whisk in peanut butter, corn syrup, vanilla extract and a pinch of salt. Transfer to a bowl and allow to cool to room temperature. Store in refrigerator until ready to use.

Make the bars:

Preheat oven to 350. Line a 9"x13" pan with non-stick foil (or spray regular foil with non-stick cooking spray).

Combine flour, baking powder, malted milk powder and salt in a medium size bowl and set aside.

In the bowl of your stand mixer fitted with the paddle attachment, cream butter and sugars until light and fluffy. Beat in eggs and vanilla at low speed until combined. Scrape down bottoms and sides of bowl. 

Add the dry ingredients and mix on low speed just until combined. Using a rubber spatula, fold in the chocolate chips and chopped pretzels.

Bake at 350f  for approximately 30 minutes or until edges are set. Remove from oven and allow to cool completely.

When bars have cooled, spread the peanut butter caramel into an even layer over the top of the bars. Refrigerate until the caramel has set (approx. 1 hour). Tip: If the caramel has been refrigerated, place it in the microwave and heat in 30 second intervals (stirring between intervals) until spreadable.


When the caramel has set, make the chocolate ganache -

Place the chocolate chips in small bowl. Microwave the heavy cream until hot and steamy, approx. 1 minute. Pour over the chocolate chips and allow to sit for approx. 3 minutes. Stir until melted then spread over the peanut butter caramel.


Garnish with mini pretzels then allow the chocolate to set. Once chocolate has set, cut into bars and serve.


Store leftovers tightly covered in an air tight container for up to 3 days.

Recipe adapted from The Kitchen Prep Blog


Wednesday, December 11, 2013

Vanilla Bean Shortbread Sandwich Cookies with Salted Dulce de Leche Filling for The Great Food Blogger Cookie Swap


I have to start off with a confession - I absolutely hate rolling out dough.  There, I said it. Whether it's cookie dough or pie dough, I can't stand rolling it. I don't know why. I will purposely try to avoid making any recipe that requires chilling and rolling out dough. That doesn't mean I won't do it, but I do it begrudgingly knowing I will curse every second I spend with the rolling pin in my hand...
 
Having said that, rolled cookies are usually the most beautiful cookies around especially holiday cookies. For The Great Food Blogger Cookie Swap to raise money for Cookies for Kids Cancer, I wanted to bite the bullet and make a rolled cookie.  I fell in love with this Salted Dulce de Leche Sandwich Cookie by America's Test Kitchen, but I modified it a bit by turning the shortbread cookies into vanilla bean shortbread cookies using vanilla bean paste. I love using vanilla bean paste in these type of recipes where the vanilla flavor really stands out and you can see the beautiful speckles of vanilla bean.
 
Ok, now that you know how much I hate rolling dough, here's the funny part to the story (or not so funny in the moment), but I got so excited that I was almost finished baking and had the exact perfect amount that I needed, that I burnt a batch. I mean burnt. As in dark brown edges instead of beautifully light golden brown. Ahhh!!! My husband rushed into the  kitchen when he heard my screams of frustration (probably thinking I had burned myself) and when he saw the cookies I was so upset over, he asked 'that's burnt?"


Yep! He just  didn't understand, the cookies I was mailing to my fellow Food Bloggers Had. To. Be. Perfect. Period.
 
Despite the drama (and me being overly critical), these cookies are really easy to make (once you get over the rolling and cutting process), and the pay off is well worth it. The taste is absolutely amazing; crunchy, buttery, "vanilla-y" all perfectly complimented by the Salted Dulce de Leche filling.


I was so excited to pack up these beauties and ship them to Sarah at The Chef Next Door, Jennifer at West Street Story and Kellie from The Suburban Soapbox. Please stop by and show them some love LiveBakeLove style....

In exchange, I received Molasses Cookies from Foodness Gracious , Italian Chocolate Cookies from Crew Cuisine and Chocolate Crinkle Cookies from o taste and see. It was so fun to receive cookies from complete strangers in the mail! And my favorite? All three!! They were all so delicious and so different from each other. I can't wait to get their recipes!


A big, heartfelt thank you to Julie from the little kitchn and Lindsay from love & olive oil for hosting and organizing the event. I am already looking forward to next year!!

If you'd like to participate in this great event, next year please sign up to receive notifications using the following link (http://eepurl.com/qCABj). I promise, your heart and your stomach will thank you....


Now onto the recipe....


Vanilla Bean Shortbread Sandwich Cookies
with Salted Dulce de Leche Filling
Makes approx. 36 sandwich cookies

Ingredients
2 sticks unsalted butter softened, then cut into tablespoon size pieces
1 oz cream cheese softened
2 1/2 cups all purpose flour
1/4 teaspoon salt
3/4 cup superfine granulated sugar (if you don't have it on hand, pulse regular granulated sugar in a food processor)
2 1/2 teaspoons vanilla bean paste

Filling Ingredients:
3/4 cup Dulce de Leche ( I used La Lechera brand)
1/2 teaspoon course sea salt


Directions:

In the bowl of your electric stand mixer fitted with the paddle attachment, mix the flour, sugar and salt until combined.

Drape a clean kitchen towel over the mixer (or use your shield attachment if you have one). With mixer on low speed, add butter on tablespoon at a time, mixing until mixture looks crumbly (approx. 2 minutes).


Add cream cheese and vanilla bean paste and mix just until a dough starts to form.


Remove the bowl and knead a few times to form a cohesive dough. Divide dough in half. Form each half into a disk and wrap in plastic wrap. Refrigerate for 30 minutes.


Work with one disk of dough at a time, roll dough out onto a floured surface until 1/8" thick. Use a 1 3/4" cookie cutter, cut into shapes. I used squares.


Place on cookie sheet lined with parchment paper.  Refrigerate for 10 minutes.

Preheat oven to 375f. Line baking sheets with parchment paper.

Bake one sheet at a time in the center of the oven until lightly golden brown, rotate sheet halfway through the baking process to promote even browning.

Remove from oven and cool on cookie sheet for 3 minutes, then remove the cookies to a cooling rack to cool completely.


Once cookies have cooled completely, make filling and assemble.

Make filling

Place Dulce de Leche in a small microwave safe bowl and microwave for 30 seconds to loosen. Stir in the sea salt.


Assemble

Transfer the Dulce de Leche to a medium size Ziploc bag and make a small cut in the corner of the bag. Pipe approx. 1 teaspoon of Dulce de Leche onto the bottom of half of the cookies, then top with the other half of the cookies and press gently to create sandwich cookies.


Here are my cookies all packaged and ready to ship! I hope they arrive safely & I can't wait to hear how the ladies like them!!


Sunday, November 13, 2011

An Intimate Thanksgiving Inspired Lunch


As a kid, Christmas was my favorite holiday. It was all about Santa and presents, Thanksgiving was just a day to eat turkey and pumpkin pie. It wasn't until we moved to Rota, Spain where my husband served as a Firefighter in the US Navy that my feelings changed. Living on the military base there and being in a foreign country completely changed my perspective. Choices and options were limited compared to the excess of life in America. There was only one clothing store, one grocery store, one school for all ages from Kindergarten all the way through to 12th grade. We met so many people who were away from their families, many who didn't know how to cook. It was then that I began to truly develop my cooking skills and began cooking homemade meals for the single firefighters my husband worked with. They were so thankful for those homemade meals that reminded them of home. At Thanksgiving, we would open our home to these servicemen so they could enjoy a traditional meal. Although our house was small and would be crammed full of people, no one complained. Everyone was thankful for the delicious food, the friendship and comraderie. Watching the look of appreciation on everyone's faces as they enjoyed the meal I made and hearing them give thanks for life's blessings even though they were far from home and away from those they loved was a rewarding experience. It was then that Thanksgiving became my favorite holiday.

These days Thanksgiving is just as meaningful to me and just as hectic. Most of our immediate family lives in San Diego so our house is still full at Thanksgiving. Everyone has their favorite dish so I rarely get to deviate from the menu or preparation. Making this Thanksgiving inspired lunch with Yvonne was a real treat. We got to develop a more "sophisticated" menu and adapt recipes any way we wanted. The afternoon we spent in the kitchen flew by and the end result was a delicious meal I would make again and again. The Cremini and Feta Crostini is so good (and I don't even like mushrooms!). The Stuffed Turkey Breast is easy, elegant and cooks in under 1 hour. The Cornbread Dressing is comforting and full of flavor. And I can't even begin to describe how delicious the desserts are....

No matter how you spend your Thanksgiving, I hope you are surrounded by those you love and I hope your blessings are too many to count.

Faye
-------------------------------------------------------------------------------------------------------------

Well it was definitely a fun-filled weekend! Faye and I were finally able to get together to cook and test out some new recipes. I showed up at Faye's house an hour earlier than expected. I guess I was excited to start cooking : ) We couldn't have picked a more beautiful Fall day to be in the kitchen. It was pouring rain outside, grey and chilly. Since Thanksgiving was on our minds, we stuck to the basics, Turkey, Stuffing, Green Beans, Potatoes and dessert! We incorporated all of the traditional Thanksgiving flavors but with a twist. I'm sure  many of you cooks out there have the same dilema that Faye and I have....our families hate any changes to the traditional dishes they enjoy on Thanksgiving and Christmas. So Faye and I decided to use this day to try out new recipes that we both personally would like to see at our Thanksgiving tables but would never be able to thanks to our stubborn families : )  The funny part was Faye's boys loved the new dishes once they tried them! They even said they wouldn't mind having them again on Thanksgiving, HA! I wish my sisters would have been there to try out these great new dishes. Maybe they also would have loved to have these new options at our Thanksgiving table!

I hope you have an open-minded family willing to try out these new recipes. Maybe they can become new traditions at your Thanksgiving table. If not, do what Faye and I did...create your own Thanksgiving on a rainy Saturday afternoon and try out anything new you want to.

Happy cooking!

Yvonne
----------------------------------------------------------------------------------------------------------       

               Happy Thanksgiving from LiveBakeLove where love is always our main ingredient!


An Intimate Thanksgiving Inspired Lunch Menu
  
Cranberry Mojitos*
Cremini Mushroom & Feta Crostini
Turkey Breast stuffed with Brie & Basil wrapped in Prosciutto
Cornbread Dressing with Sausage, Apples & Rosemary
Homestyle Smoky Green Beans & New Potatoes*
Caramel Apple Cheesecake Pie
Chocolate Bottom Pumpkin Tart
* the recipes marked with an asterick are not posted but feel free to e-mail us if you want them


Some of the Crostini are without cheese because I can't eat dairy : (


Cremini Mushroom and Feta Crostini
Serves 4-6

Ingredients:
2 cups cremini mushrooms, cleaned and chopped
2 tsp garlic, chopped
1/2 cup scallions, minced
2 T extra virgin olive oil
2 T flat leaf parsley, finely chopped + additional for garnish
2 T sundried tomatoes, chopped
Kosher salt & freshly ground pepper, to taste
Feta Cheese for garnish
1/2 loaf french baguette

Directions:

Prepare the crostini:
With a serrated knife, cut 1/2 of the baguette on the diagonal into 1/2" thick slices. Brush with olive oil and sprinkle with salt and fresh cracked pepper.

Place on a baking sheet and bake at 375 for approx 5 minutes or until toasted. Remove from oven and set aside.

Prepare the mushroom topping:
In a skillet over medium heat, heat olive oil until hot. Add the scallions and cook until softened. Add garlic and cook for 30 seconds. Add the mushrooms, salt and pepper and cook, stirring occassionally for 5 minutes. Add remaining ingredients and cook, stirring occassionally, for 3 minutes. Spread onto the prepared crostini, top with feta cheese and return to the oven for a few minutes to warm up the cheese. Place on a platter and garnish with additional parsley. Serve warm.


Turkey Breast Stuffed with Brie & Basil wrapped in Prosciutto
Adapted from Relish
Serves 4-6

2 boneless skinless turkey breasts halves (each about 1 1/2 lbs)
1 tsp salt
Freshly ground black pepper
1/2 lb brie (or fontina would be a good substitute as well)
Basil leaves
Prosciutto (approx 6 slices)

Preheat oven to 350

Make a large pocket like slit in each turkey breast half and unfold like a book. Sprinkle with salt and pepper.

Remove the rind from the brie and slice into 1/4-1/2" thich slices. Place a few basil leaves on top of the brie to cover.


Fold the other half of the breast over the filling. Loosely wrap the prosciutto around each turkey breast (I needed about 3 slices of prosciutto for each breast).

Place in a small roasting pan on a rack (I used whole carrots and celery to form a rack). Place in the oven and roast for approx 35-45 minutes. The turkey is done when a meat thermometer inserted in the thickest part of the meat registers 160F. Remove from oven, tent with foil and allow to rest for 10-15 minutes. The temperature of the meat will rise approx 5F during the resting process.

Place on a cutting board and with a sharp carving knife, slice on the diagonal into 1-1 1/2" thick slices. Place on a platter and serve warm.

** I recommend making a quick pan sauce with the pan drippings.


Cornbread Dressing with Sausage, Apples and Fresh Rosemary
Adapted from The Pioneer Woman
Serves 8

Ingredients:
2 c cremini mushrooms, sliced
2 T Canola Oil
1/4 tsp Kosher Salt
2 c cornbread, cut into 1" cubes
2 c french bread, cut into 1" cubes
2 c artisan bread, cut into 1" cubed
1/2 lb italian sausage
1 c diced onion
2 granny smith apples, cut into large cubes
2 T brown sugar
1/2 c white wine
1/4 tsp kosher salt
16 oz low sodium chicken broth
1/2 tsp dried Thyme
1/2 tsp Tumeric
1/4 tsp salt
2 tsp Rosemary leaves, minced
1 c dried cranberries
Freshly Ground Black Pepper, to taste
3/4 c Fresh Parsley, minced (for garnish)

Place diced bread on a cookie sheet and allow to sit out several hours or overnight to dry out

Preheat oven to 500

Place sliced mushrooms on a baking sheet. Toss with canola oil and 1/4 tsp salt. Roast for 20 minutes, stirring halfway through the process. Remove from the oven when mushrooms are deep brown. Set aside.

In a large skillet, brown the sausage over medium heat. Remove sausage from skillet and set aside.

Add diced onions to the skillet and brown for 5 minutes. Increase heat to high and add apples, brown sugar, 1/4 tsp salt. Cook for 3-5 minutes or until deep golden brown. Decrease heat to medium and pour in the wine. Stir and cook until liquid is reduced by half (about 2-3 minutes). Pour the apple/onion mixture in a bowl and set aside.

Add the chicken broth to the skillet and add the thyme, tumeric, rosemary salt and pepper. Stir and cook until warmed through. Set aside.

Put the cubed bread in a large bowl. Add the sausage, the apple onion mixture along with it's juices and the mushrooms and cranberries. Toss to combine. Add about 3/4 of the broth mixture (be sure to give the broth a good stir before adding to redistribute the spices). Toss to coat. If more moisture is needed, add more of the broth mixture. Keep in mind you might not need to use all of the broth mixture, the moisture level is up to you. Add the chopped parsley and toss to coat.

Taste the mixture for seasonings and adjust as needed.

Preheat oven to 375. Place mixture in a skillet or baking dish and bake covered for 20-25 minutes. The dressing is ready to serve at this point or you can uncover, return to oven and allow the top to get browned/crispy if desired.


Chocolate Bottom Pumpkin Tart
Makes a 10" tart (Serves 10)


Ingredients:

Pumpkin SpiceTart Dough
2 c all purpose flour
1/4 tsp salt
6 T granulated sugar
1 tsp Pumpkin Pie Spice
1 1/2 c unsalted butter, cut into pieces (butter should be cold)
2 large egg yolks
4 T heavy cream
2 tsp vanilla

Chocolate Bottom:
1/2 c heavy cream
4 oz dark chocolate. chopped

Pumpkin Filling
1 1/2 c canned pumpkin puree (not pumpkin pie filling)
1/2 c granulated sugar
1/2 tsp ground cinnamon
1/8 tsp ground allspice
1/8 tsp ground cloves
1/8 tsp ground nutmeg
1/2 c heavy cream
2 large eggs
1 T cornstarch

Cinnamon Whipped Cream
1 c heavy cream
1/4 tsp cinnamon
1/4 tsp vanilla exract
2 T powdered sugar

Directions:

Make the tart dough:
Place the flour, salt and sugar in the bowl of a food processor and pulse a few times to combine. Scatter the cold butter pieces over the flour and pulse about 15 times until the mixture resembles course meal. Transfer to a large mixing bowl.
Whisk together the eggs, cornstarch and vanilla and pour over the flour mixture. Toss with a rubber spatula until the dough begins to stick together. Using your hands, knead the mixture very briefly to bring the dough together. Place on plastic wrap, form a disk and refrigerate for a minimum of 2 hours or up to 3 days.

Preheat oven to 425. Remove the dough from the refrigerator and place on a generously floured surface. Sprinkle a small amount of flour on top of the dough. Using a rolling pin, roll the dough out to form a circle approximately 11". Fit the dough into the tart pan with removable bottom, prick the bottom with a fork, line with aluminum foil and fill with beans or pie weights. Bake for 20 minutes. Remove the foil and beans/weights, reduce temperature to 350 and bake for a few minutes more until the crust is golden brown. Remove from oven to cool.

Make the chocolate bottom:
Place the cream and chopped chocolate in a microwave safe bowl and microwave on high for 1 minutes. Remove and stir well to combine and melt the chocolate. If the chocoalte is not melting into the cream, return to microwave for an additional 30 seconds and stir again. Pour the chocolate onto the bottom of the crust and spread carefully in an even layer. Cool until set.

To make the pumpkin filling:
Combine the pumpkin, sugar, cinnamon, allspice, cloves, nutmeg and heavy cream in a medium saucepan. Cook over medium heat, stirring frequently, until hot but not bubbly. Whisk the eggs with the cornstarch and add to the saucepan. Continue cooking, stirring constantly until thickened and bubbly. Remove from heat and cool to room temperature.

Pour the cooled filling into the tart shell and smooth the top with a rubber or offset spatula. Refrigerate for a few hours or until firm.

To make the Cinnamon Whipped Cream topping:
In the bowl of an electric stand mixer fitted with whisk attachment, beat the heavy cream on medium speed until it begins to foam. Add the cinnamon, vanilla and powdered sugar. Increase speed to high and beat until desired consistency (soft or stiff peaks).

To serve the tart: Garnish with Cinnamon Whipped Cream and drizzle with melted chocolate if desired.

Store leftovers covered in the refrigerator up to 2 days.


Caramel Apple Cheese Cake Pie
Adapted from Annies Eats
Serves 12-14


Ingredients:

Crust:
1/2 c graham cracker crumbs
3 T sugar
3/4 tsp cinnamon
6 T melted butter
3/4 c caramel (either homemade or store bought)
1 c chopped pecans

Apple Filling:
5 T unsalted butter
1/2 c light brown sugar, firmly packed
1/4 tsp salt
1 tsp cinnamon
5 Granny Smith apples, peeled and thinly sliced

Cheesecake:
1 8oz package cream cheese, softened
1/4 c sugar
1 tsp vanilla extract
1 large egg
1 T freshly squeezed lemon juice

Cinnamon Whipped Cream Topping
1 c heavy cream
1/4 tsp cinnamon
1/4 tsp vanilla extract
2 T powdered sugar

Directions:

Make the crust:
Preheat oven to 375. In a medium bowl combine the graham cracker crumbs, sugar, cinnamon and melted butter. Toss with a fork to combine. Press into the bottom and 1" up the sides of an 8' or 9" springform pan. Bake for 6-8 minutes or until golden in color. Let cool 10 minutes. Pour the caramel on top of the crust and sprinkle with the chopped pecans.

Make the Apple Filling:
In a large skillet over medium heat, melt the butter. Once the butter has melted add the brown sugar, salt and cinnamon and cook for 1 minute or until bubbly, stirring occassionally. Add the apples and mix to coat. Cook over medium to medium-high heat until the apples are tender and most of the liquid has reduced (about 15 minutes). Let cool for a few minutes and then pour into the bottom of the prepared pie shell.

Make the Cream Cheese Filling:
In a large bowl, with an electric mixer, beat the cream cheese and sugar until creamy and well combined with no lumps. Mix in the vanilla, egg and lemon juice until combined. Pour over the apple filling and spread evenly. Bake at 350 until the filling is set (appeox 20-30 minutes). Remove from oven and allow to cool to room temperature. Refrigerate for a minumum of 4 hours or overnight.

Before serving, make the Cinnamon Whipped Cream (directions above). Remove the sides of the springform pan and decorate/garnish with the whipped cream as desired. Store any leftovers covered in the refrigerator for up to 2 days.

The layers of the caramel, pecans, carmelized apples and cheesecake filling we soooo good


Setting the mood for the afternoon....


A closeup of the Cranberry Mojito....yummm


Here's a shot of the Green Beans & Potatoes, we thought the colors in the dish were so pretty and the flavors were great


Tuesday, October 4, 2011

Goodbye Summer Skillet Peach Pie


Goodbye Summer Skillet Peach Pie

Summer is over and it's time to say goodbye to all of the delicious berries and stone fruit that Summer offers, strawberries, raspberries, blueberries, cherries, plums and peaches. Stopping at the grocery store on my way home from work tonight to grab some last minute ingredients to make dinner, I noticed peaches were on sale, and as luck would have it, they were ripe! So on impulse, I decided to make a skillet peach pie but to jazz it up with something extra special...there is a bed of caramel hiding underneath the bottom crust! Yes, you heard (or should I say read) right....caramel. How can you resist?

Ingredients:
6 T unsalted butter
3/4 c light brown sugar
1 package of premade pie crust
4-5 lbs of fresh, ripe peaches peeled and sliced in 1/2" thick slices
1/2 brown sugar, packed
1/4 c granulated sugar
1 tsp cinnamon
1/4 tsp nutmeg
1/2 tsp lemon zest
juice of 1/2 lemon
3 T flour
1 egg white
2 T granulated sugar
1 T cinnamon

Bring the crusts to room temperature by setting out for 15-20 minutes

Combine the 2 T of granulated sugar and 1 T cinnamon in a small bowl. Set aside.

Put the peaches in a large bowl, toss with the sugar, brown sugar, cinnamon, nutmeg, lemon zest, lemon juice and flour.
In a 9" cast iron skillet, melt the 6 T of butter over medium heat. Add the 3/4 c brown sugar and cook stirring constantly for approx 2-3 minutes until sugar is dissolved into the butter and bubbly.


Remove from heat. Be very careful, this mixture is extremely hot!

On a floured cutting board, roll out one of the pie crusts so that it fits into the skillet with a little overhang.


Carefully transfer it to the skillet over the brown sugar/butter mixture. Layer the peach mixture over the pie crust in the skillet.

Roll out the second pie crust and place it on top of the peaches. Fold the edges of the top crust under the edges of the bottom crust, creating a seal. Flute the edges if you like, but that is totally unnecessary since we are making a rustic style dessert.

Beat the egg white until frothy. Brush on top of the pie crust, then sprinkle with the cinnamon sugar mixture. Cut 4 slits in the top of the crust.


Place the skillet on a large baking sheet to catch the drippings. Bake for 1 hour until filling is bubbly and crust is golden brown. If your crust browns to quickly, tent it with foil to prevent burning or overbrowning.

Remove from oven and allow to cool for 30 minutes to an hour so the juices can thicken.

Top with ice cream if desired (I strongly recommend it!). Enjoy!!


                                      Ahh...what a way to say goodbye to Summer, don't you think?